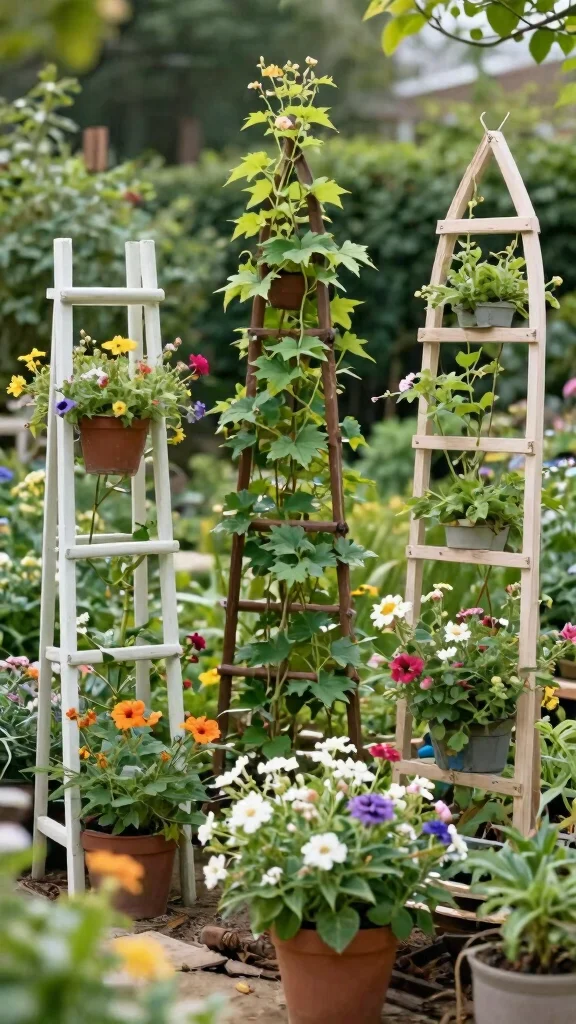
Building a thriving garden can sometimes feel like a daunting challenge, especially when space is limited. That’s why I created this post to share innovative and practical solutions for those who want to embrace the beauty of climbing vines without breaking the bank or spending weeks on a project. If you’re dreaming of lush green walls, fragrant flowers, or even a bit of privacy in your yard, you’ve come to the right place.
This post is for anyone passionate about gardening, whether you’re a veteran with a green thumb or a beginner just starting out. If you’ve ever wondered how to provide climbing plants support in a small area or how to enhance your outdoor space with vertical gardening solutions, you’ll find something here that resonates with you. I’ve gathered 12 DIY trellis ideas that are not only easy to build but can also transform your garden into a beautiful haven in just an afternoon.
Get ready to dive into a world of creativity with homemade trellis designs that suit any style—from rustic to modern. You’ll discover garden trellis projects that help you maximize your space while adding character and charm. Whether you want a simple structure or a unique statement piece, the trellis ideas in this guide will inspire your next gardening adventure.
Key Takeaways
– Discover 12 DIY trellis ideas that can be built in just one afternoon, making it easy to enhance your garden quickly.
– Learn how to provide climbing plants support with different materials and designs, catering to various styles and preferences.
– Each trellis project includes practical instructions and tips, ensuring that even beginners can successfully create their own structures.
– Explore vertical gardening solutions that maximize limited space while adding beauty and interest to your outdoor area.
– Find inspiration in unique homemade trellis designs, from rustic wooden frames to modern PVC pipe structures, that suit any garden aesthetic.
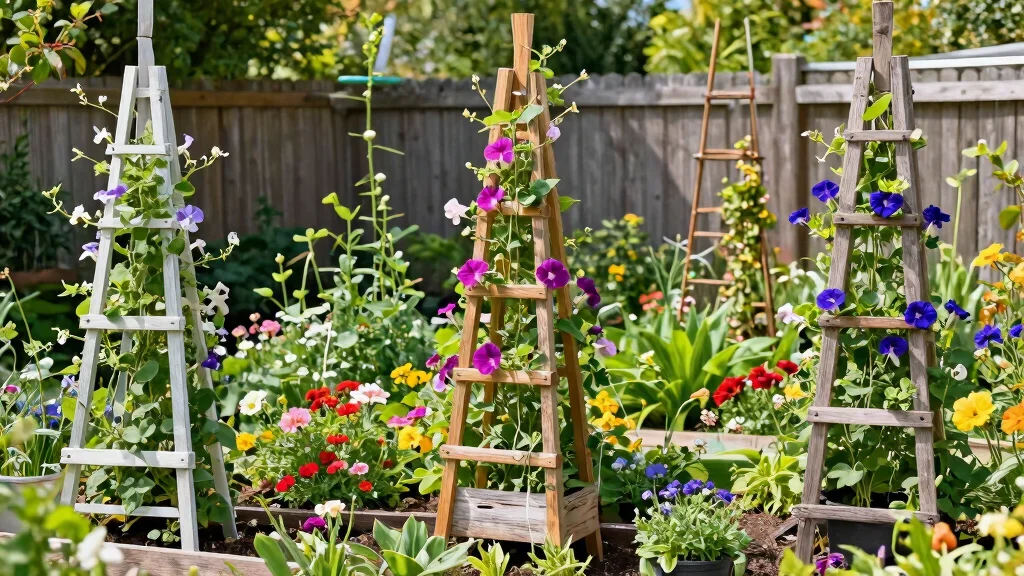
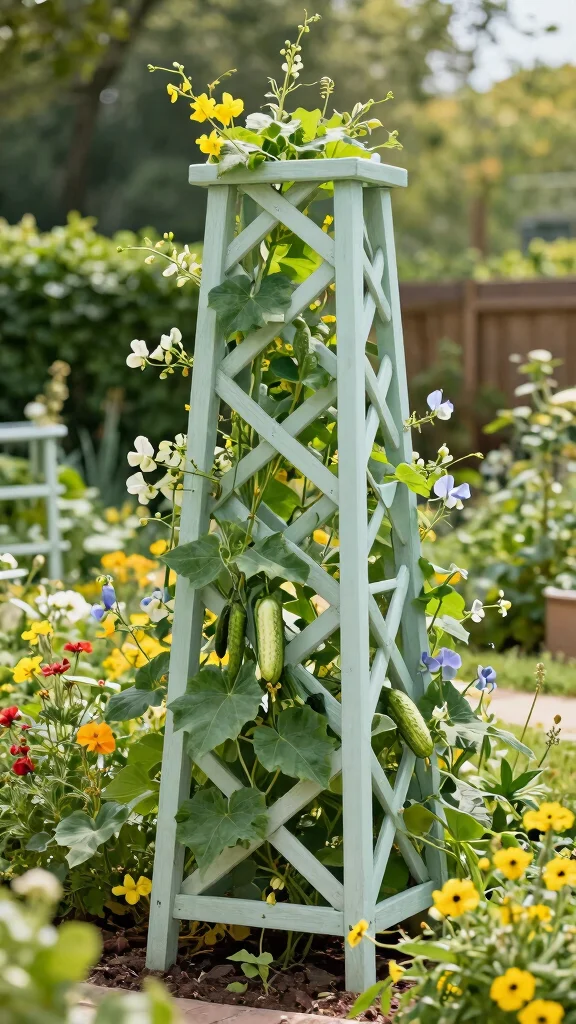
1. Rustic Wooden A-Frame Trellis
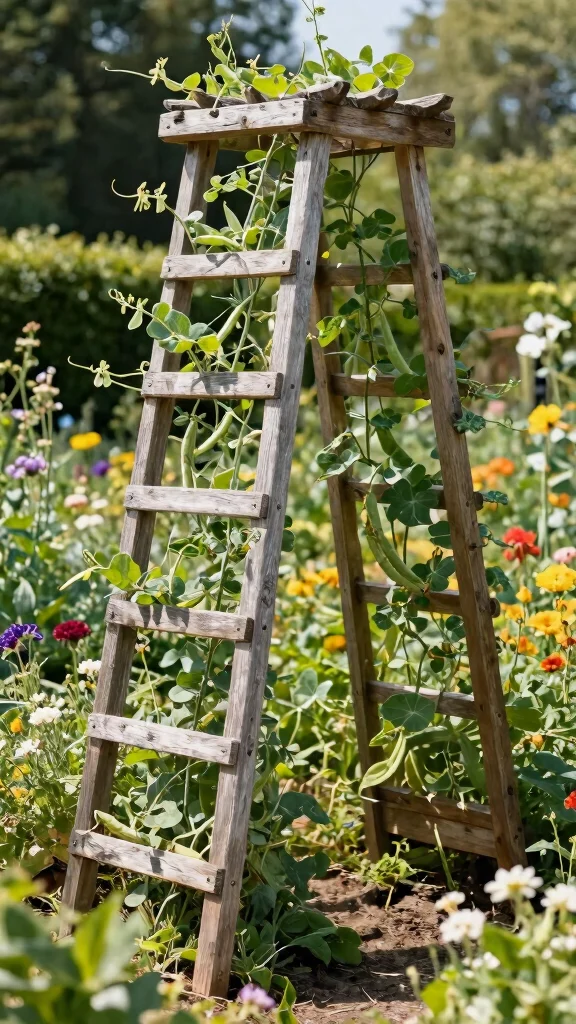
Add a charming farmhouse touch to your garden with a rustic wooden A-frame trellis. This design is not only easy to construct but also provides solid support for climbing plants like peas and beans. All you need are some robust wooden planks, nails, and a saw. Start by cutting two long pieces for the sides and one shorter piece for the top to create a triangular shape. Nail the frame together, then leave it natural or paint it to suit your garden’s vibe.
Begin by measuring your garden space and choosing the right height for your trellis. Focus on sturdy wood to ensure longevity, and consider using a weather-resistant finish. This design can adapt to various plant types, enhancing your garden aesthetics while supporting growth.
Here’s how to get started:
– Cut two long wooden planks for the sides
– Create a triangular frame with one shorter top piece
– Securely anchor the trellis in the ground
– Allow climbing plants to wind around the structure
With this A-frame design, your climbing plants will thrive, and your garden will flourish with stunning visual appeal!
2. Bamboo Ladder Trellis
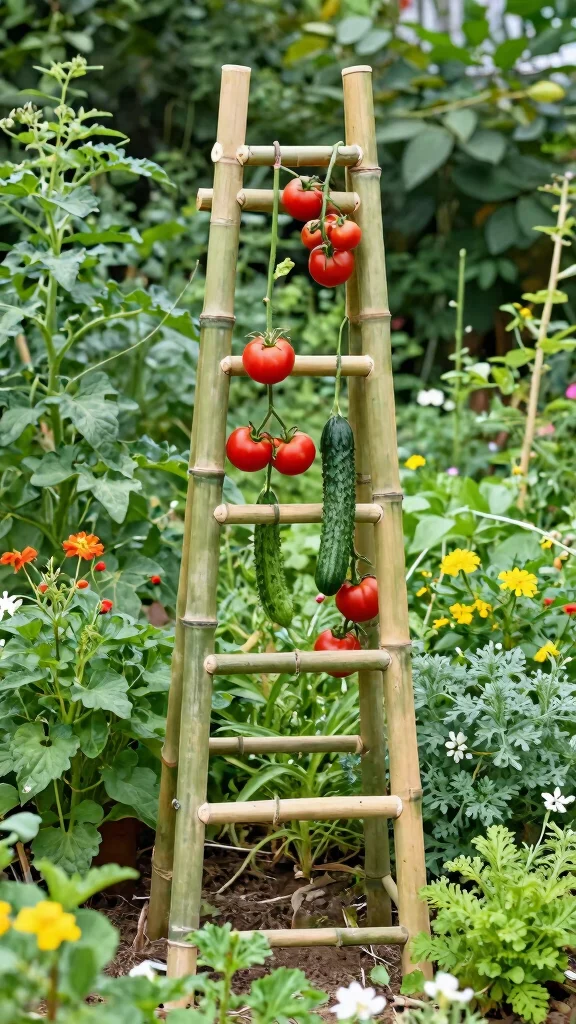
If you’re looking for a quick and eco-friendly trellis option, a bamboo ladder trellis is perfect. Bamboo is lightweight and strong, making it ideal for supporting climbing vines like tomatoes and cucumbers. Simply take two long bamboo poles for the sides and several shorter pieces for the rungs. Secure the rungs with twine or wire, ensuring they’re evenly spaced for optimal growth. You can choose a natural finish or paint it to harmonize with your garden’s style.
Start by selecting the right bamboo sizes for your plants, and measure the height based on the varieties you want to grow. This trellis is versatile, allowing you to reposition it as your garden needs change throughout the season.
Follow these steps to build your trellis:
– Cut bamboo to desired lengths for sides and rungs
– Secure rungs with twine or wire for stability
– Anchor the structure in your garden
– Guide climbing plants towards the rungs as they grow
This bamboo ladder trellis not only supports your plants but also introduces a unique aesthetic to your garden!
3. Wire Mesh Trellis Wall
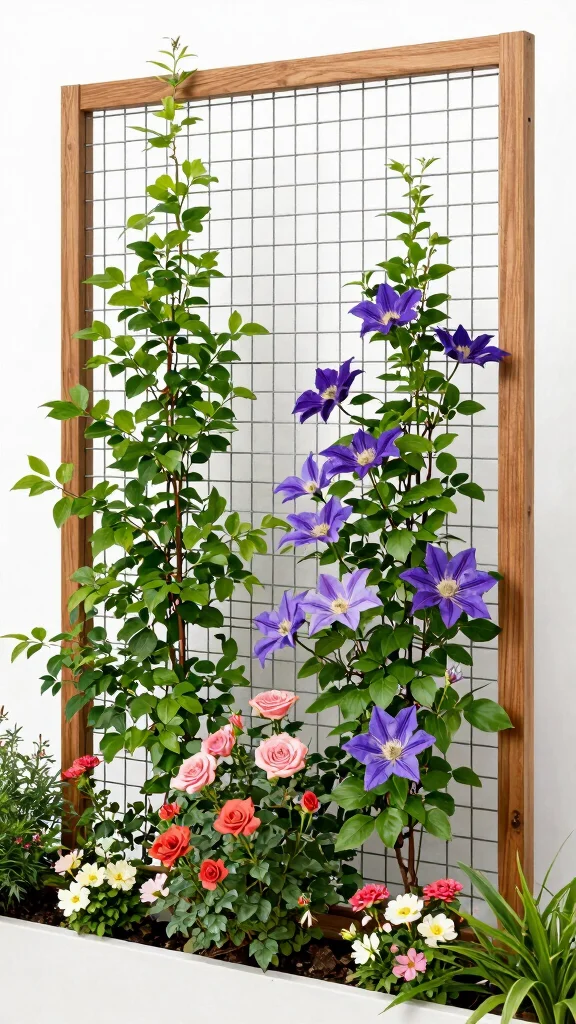
Elevate your outdoor area with a vertical wire mesh trellis wall. This modern design is ideal for small gardens where space is limited. To create it, you’ll need a wooden frame to which you can attach wire mesh, allowing climbing vines like clematis or climbing roses to thrive. This straightforward project can be completed quickly, and it doubles as a natural privacy screen for your space.
Before starting, measure the area to ensure the trellis fits perfectly. Consider using a reinforced mesh for increased durability, and think about adding decorative elements like lights for a touch of charm.
Here’s how to make your trellis wall:
– Measure and cut wooden boards to create a frame
– Attach wire mesh securely using nails or screws
– Anchor the trellis to a stable surface
– Plant climbing vines at the base and train them upwards
This wire mesh trellis not only supports your plants but also transforms your outdoor space into a vibrant green wall!
Small garden? A wire mesh trellis wall turns blank space into a leafy privacy screen in no time. With a simple wooden frame, trellis ideas diy climbing vines come to life—fast; measure your area first for a perfect fit.
Difficulty Rating & Requirements
Overall Difficulty Rating: Medium
Building a DIY trellis for climbing vines is a manageable project for most gardeners. While some designs may seem intimidating, many can be accomplished with basic tools and materials. This is suitable for those with a bit of hands-on experience, but even beginners can tackle simpler designs with guidance.
Time Estimate:
⏱ Estimated time: 3-5 hours
The time varies based on the complexity of your chosen design. For example:
– Simple designs like the Bamboo Ladder Trellis may take around 3 hours.
– More intricate structures like the Garden Arch with Planters might require up to 5 hours.
Skill Requirements:
– Required skills: Basic woodworking, measuring, and assembling skills.
– Beginner-friendly: Yes, with the right instructions, anyone can learn the necessary skills.
– Skills that can be learned include measuring, cutting, and assembling. More advanced techniques, such as welding for metal trellises, may require prior experience.
Tools & Materials Needed:
🧰 Essential items checklist:
– Measuring tape (Required)
– Saw (Required) – a hand saw or power saw depending on materials.
– Drill (Required) – for creating holes and securing screws.
– Screws/Nails (Required) – to hold your structure together.
– Wood/Bamboo/PVC pipes (Required) – your main building material.
– Paint or sealant (Optional) – to weatherproof your trellis.
– Gardening gloves (Optional) – to protect your hands while working.
– Level (Optional) – ensures your trellis is straight and even.
Step-by-Step Overview:
1. Planning and Design (1 hour) – Choose a design and gather materials. Sketching your trellis can help visualize the final product.
2. Cutting and Preparing Materials (1-2 hours) – Use a saw to cut your materials to size. Measure twice to ensure accuracy.
3. Assembling the Trellis (1-2 hours) – Follow your design, using screws and nails to secure everything together.
4. Finishing Touches (30 minutes) – Add paint or sealant if desired. This helps protect your trellis from the elements.
5. Installation (30 minutes) – Secure the trellis in your desired location and start planting your climbing vines!
Cost Comparison: Professional vs DIY:
Building a trellis yourself typically costs between $50-$150, depending on materials. Hiring a professional to build a similar trellis can range from $200 to $500. If you’re handy and enjoy DIY projects, making your own trellis can be both economical and rewarding. If you’re short on time or unsure about your skills, hiring a pro might be the right choice for you.
4. Repurposed Pallet Trellis
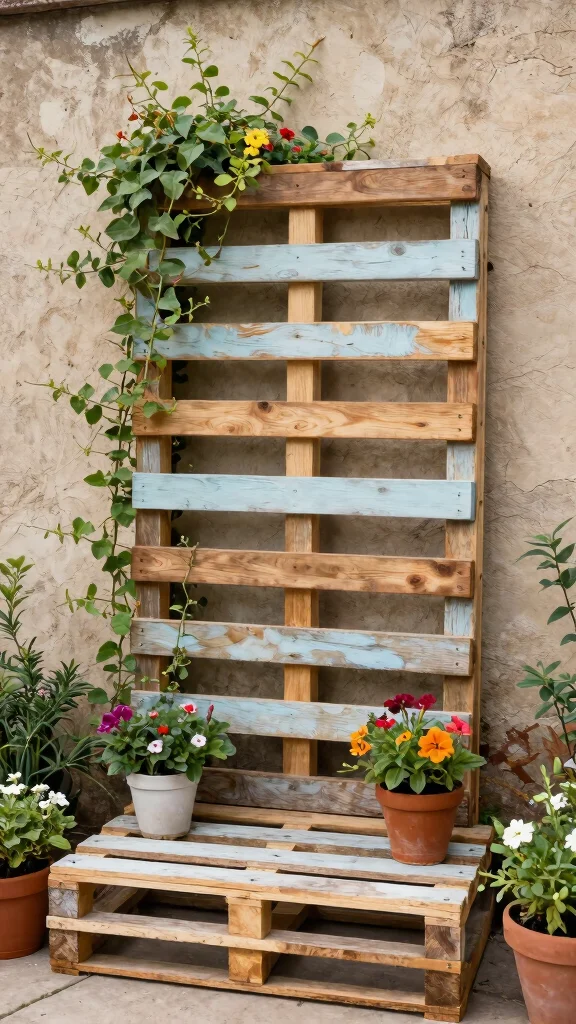
Transform old wooden pallets into a chic trellis for climbing vines! This budget-friendly project is sustainable and stylish. Start by selecting a sturdy pallet and cleaning it up. You can keep it rustic or choose a fun color to add personality to your garden. Lean or anchor the pallet against a wall or fence, and plant climbing vines at the base. As they grow, they will create a beautiful green backdrop that’s sure to impress!
Consider the location of your pallet trellis to maximize sunlight exposure. Sand down any rough edges for safety, and think about using a weather-resistant finish if it will be exposed to the elements.
Here are the steps to create your pallet trellis:
– Clean and sand the pallet thoroughly
– Optionally, paint or stain it for a stylish touch
– Lean the pallet against a wall or secure it in the ground
– Plant climbing vines around the base and train them upwards
This repurposed pallet trellis will not only support your climbing plants but also serve as a unique garden feature that showcases your creativity!
5. Classic Lattice Trellis
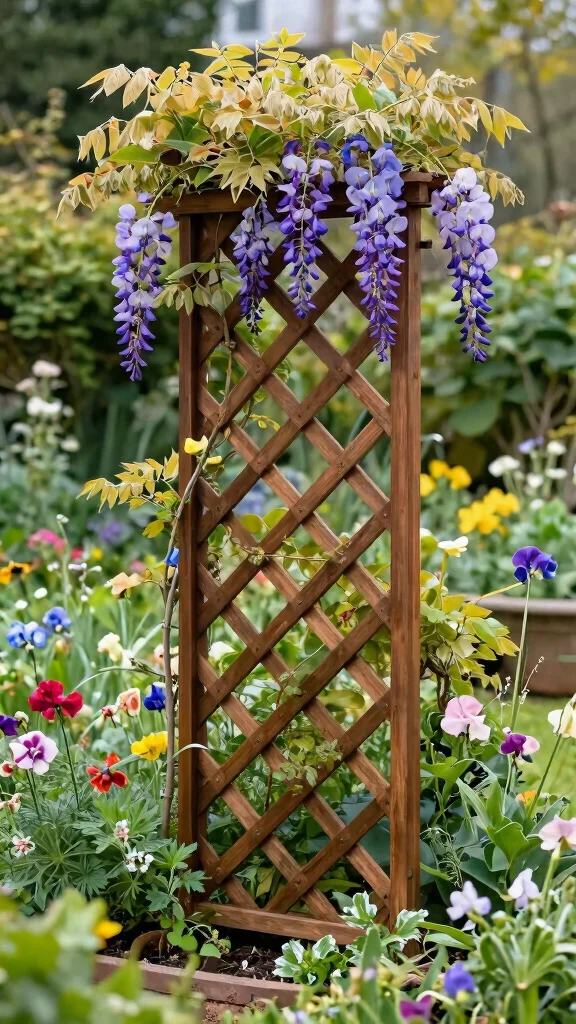
Experience the timeless elegance of a classic lattice trellis! This design offers excellent support for climbing plants while allowing sunlight to filter through. Ideal for trailing flowers like wisteria or sweet peas, building a lattice trellis involves simple wooden strips. Cut the strips into equal lengths and arrange them into a grid pattern. Secure the intersections with nails or screws, and attach the trellis to a wall or fence for added stability.
Before you begin, consider the height needed for the plants you wish to grow. Using treated wood can help prevent rot, ensuring your trellis lasts for years. Take time to paint or stain it to match your garden design.
Key steps to create your lattice trellis:
– Cut wooden strips to desired lengths
– Arrange the pieces in a crisscross pattern
– Secure at the intersections with nails or screws
– Attach the lattice to a wall or firmly in the ground
This classic lattice trellis adds elegance to your garden while providing strong support for your climbing plants!
Fun fact: a lattice trellis can boost sunlight access and airflow for climbing vines by up to 30%. With simple wooden strips, a grid pattern, and a few nails, DIY trellis ideas become a prime small-space solution.
6. Solar-Powered Trellis
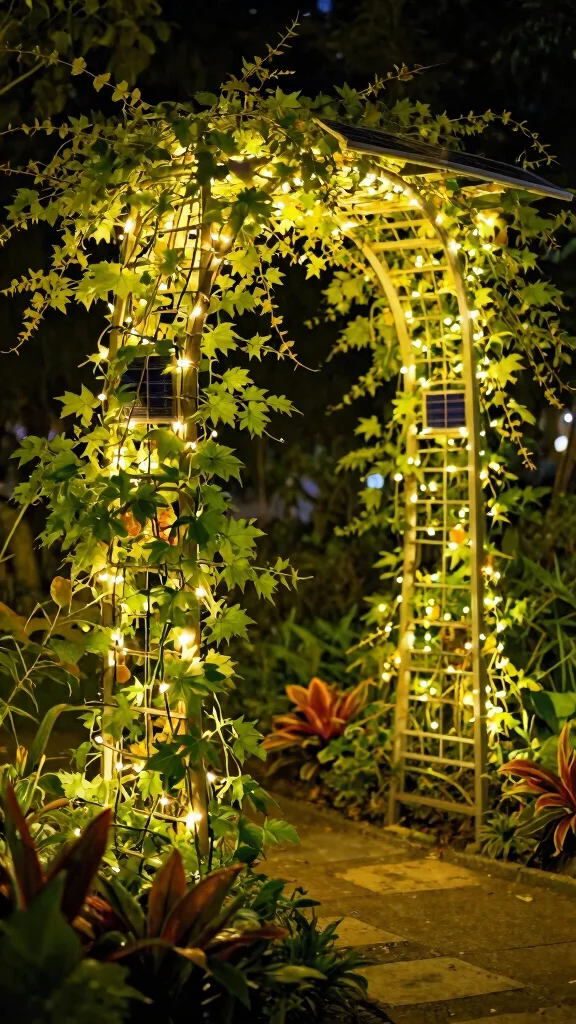
If you want to add a whimsical touch to your garden at night, a solar-powered trellis is a fantastic choice! This creative design combines functionality with illumination. Start with a basic wooden or metal trellis and attach solar-powered string lights along the framework. As your climbing plants grow, they’ll weave around the trellis, and at night, the lights will create a magical ambiance in your garden.
Choose a sunny location for your trellis to ensure the solar lights charge effectively. Opt for warm-toned lights for a cozy atmosphere, and consider adjusting their placement as your plants grow to maintain an enchanting display.
Steps to build your solar-powered trellis:
– Set up your trellis in a sunny area
– Attach solar-powered string lights using zip ties
– Plant climbing vines at the base and encourage them to grow upwards
– Allow the solar lights to charge during the day for nighttime use
This solar-powered trellis brings charm to your garden, making your evenings feel extra special!
7. Archway Trellis
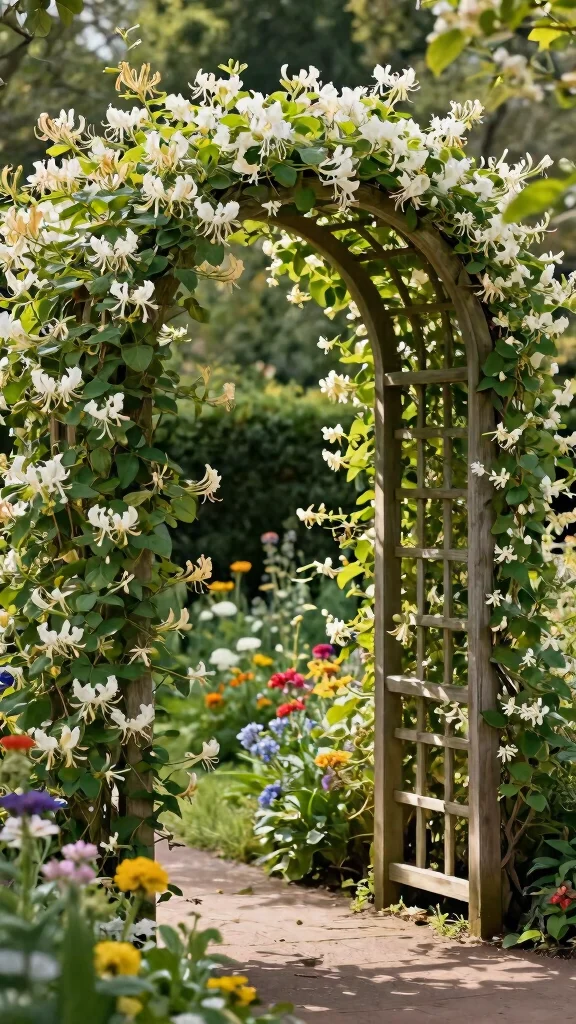
Create a stunning entryway to your garden with an archway trellis! This design serves as a beautiful focal point while supporting climbing vines like honeysuckle or jasmine, filling your space with delightful fragrances. Building an archway trellis is simple; start with curved wooden beams or metal pipes to form a semicircular shape. Secure it firmly in the ground, and let your climbing plants wind their way up for a breathtaking effect.
When choosing your materials, ensure they’re sturdy enough to hold the weight of climbing vines. Consider adding decorative elements like hanging planters or lights to enhance the charm of your archway.
Follow these steps to construct your archway trellis:
– Cut beams or pipes to desired lengths
– Construct a semicircle shape and secure ends together
– Firmly anchor the archway in the ground
– Plant climbing vines at the base and guide them up the structure
This archway trellis will add a romantic touch to your garden while providing ample support for your climbing plants!
8. Freestanding Garden Trellis
For flexibility and style, a freestanding garden trellis is an excellent option! This DIY project allows you to place your trellis anywhere in your garden, making it versatile for various climbing plants. Use wooden boards to create a rectangular frame with a crisscross design that climbing plants can cling to. This sturdy and mobile trellis can be repositioned throughout the growing season to find the perfect sunny spot!
When building your trellis, ensure it’s stable enough to withstand wind and heavy vines. Consider using untreated wood for a more natural look or painting it to match your garden design.
Key steps to construct your freestanding trellis:
– Cut wooden boards to size for the frame and cross supports
– Assemble the frame securely with nails or screws
– Attach the crisscross supports for climbing plants
– Place the trellis in a sunny area of your garden
A freestanding garden trellis not only supports your plants but also enhances your garden design with style!
9. Vintage Door Trellis
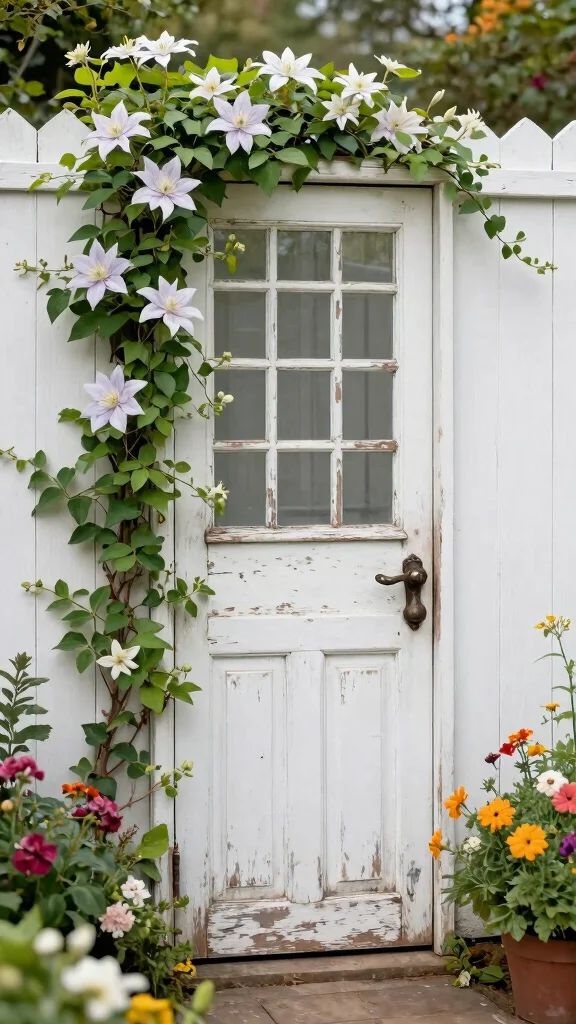
Bring character into your garden with a vintage door trellis! This charming design repurposes an old door into a stunning vertical garden feature. Start by sanding and painting the door as desired, then lean it against a wall or secure it vertically in the ground. Plant climbing vines at the base to let them climb gracefully up the door, creating a whimsical backdrop full of personality.
Choose a door with unique details for added charm, and ensure it’s sturdy enough to support the climbing plants. Adding hooks or shelves can provide extra functionality while enhancing the aesthetic.
Here’s how to make your vintage door trellis:
– Clean and sand the door thoroughly
– Optionally, paint or stain the door to match your garden
– Lean the door against a wall or secure it firmly
– Plant climbing vines at the base and let them grow up the door
This vintage door trellis will not only support your climbing plants but also serve as a unique focal point that tells a story in your garden!
10. Concrete Block Trellis
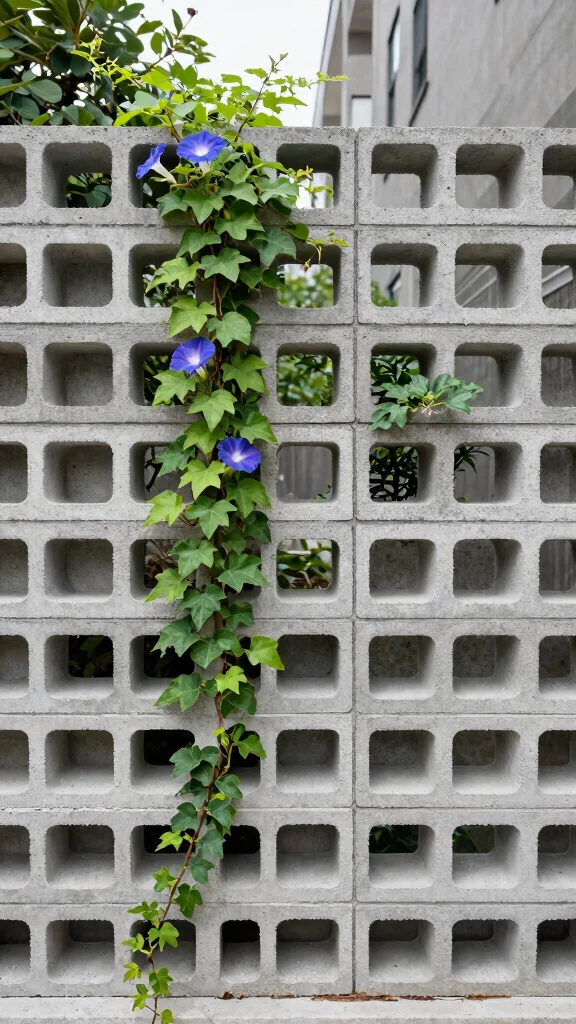
For a modern and industrial touch, consider a concrete block trellis. This robust design is perfect for urban gardens and can withstand various weather conditions. Stack concrete blocks to form a rectangular frame, leaving spaces for climbing vines. Once secured, plant your favorite climbing plants at the base. The rustic look of concrete adds an interesting texture to your garden!
When constructing your trellis, ensure that the blocks are stable and secure. Think about adding drainage rocks at the bottom for better soil management and consider mixing different plants for a colorful display.
Steps to build your concrete block trellis:
– Stack concrete blocks in your desired arrangement
– Fill the center of the blocks with soil
– Plant climbing vines or flowers in the soil-filled blocks
– Allow the vines to climb up the blocks over time
This concrete block trellis not only supports your climbing plants but also serves as a striking statement piece in your garden!
11. Garden Arch with Planters
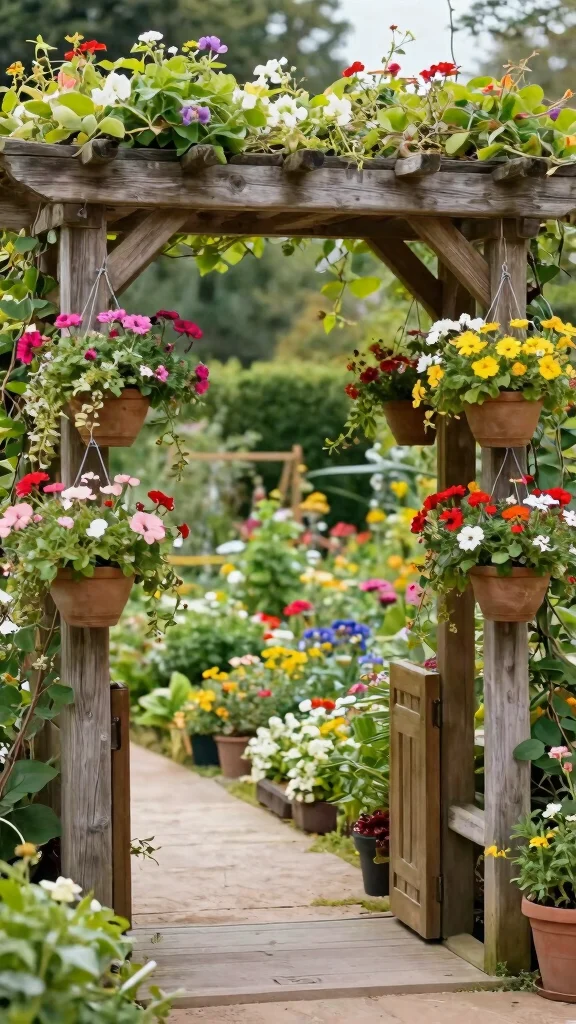
Merge beauty and functionality with a garden arch that includes planters! This captivating design allows you to grow climbing vines while adding colorful flowers or herbs in hanging planters. Build the arch with sturdy wooden beams, leaving space for planters on the sides. As your climbing plants flourish, they’ll create a lush green archway that enlivens your space and attracts pollinators.
When constructing the arch, ensure it’s stable enough to support both the plants and the planters. Opt for lightweight planters to avoid putting too much stress on the structure.
Here are the steps to create your garden arch:
– Construct the arch using wooden beams for stability
– Attach hanging planters to the sides
– Fill planters with potting soil and plant your chosen flowers
– Plant climbing vines at the base and guide them upwards
This garden arch with planters creates a stunning entryway that’s not only visually appealing but also functional for your space!
12. Vertical PVC Pipe Trellis

For a truly unique approach, try a vertical PVC pipe trellis! This lightweight design can be customized to fit any space. Cut PVC pipes into various heights and connect them with horizontal pipes to form a grid. Paint it to match your garden theme, and it effectively supports lighter climbing plants like peas and cucumbers. Place it against a wall or in the ground for a modern touch!
Consider choosing a bright color for a fun, contemporary look. Ensure the structure is securely anchored to maintain stability as your plants grow.
Steps to build your vertical PVC pipe trellis:
– Cut PVC pipes to desired lengths for vertical and horizontal sections
– Connect sections using pipe connectors to form the trellis
– Securely place the trellis in the ground or against a wall
– Plant climbing vines at the base and train them to grow upward
This vertical PVC pipe trellis is an excellent way to support climbing plants while adding a stylish twist to your garden!
Fun fact: This vertical PVC pipe trellis is one of the best trellis ideas for DIY climbing vines and can be assembled in under an hour. It’s lightweight, customizable, and perfect for supporting peas and cucumbers in small spaces.
Conclusion
Creating a DIY trellis for your climbing vines can add beauty and functionality to your small garden space. Each of these twelve designs offers something unique, allowing you to tailor your garden to your style and needs. From rustic wooden frames to modern PVC structures, the possibilities are endless. So gather your materials and get started on your trellis project! Your climbing plants will thank you, and your garden will become a stunning vertical paradise!
Explore these ideas and share your own creations with fellow gardening enthusiasts!
Note: We aim to provide accurate product links, but some may occasionally expire or become unavailable. If this happens, please search directly on Amazon for the product or a suitable alternative.
This post contains Amazon affiliate links, meaning we may earn a small commission if you purchase through our links, at no extra cost to you.
Frequently Asked Questions
What are the best DIY trellis ideas for climbing vines in a small garden?
Here are top trellis ideas diy climbing vines that fit a small garden: a freestanding lattice panel, a simple cattle-panel arch, a repurposed pallet trellis, or a wall-mounted wire-grid panel. These options provide solid climbing plants support without taking up much space. Most can be assembled in a single afternoon with basic tools such as a drill, screws, and a level. Choose rot-resistant wood or powder-coated metal to create durable outdoor vine structures that last season after season.
Can I build any of these garden trellis projects in an afternoon, even if I’m not handy?
Yes—several garden trellis projects can be completed in an afternoon, even for beginners. Start with a pallet trellis or a wall-mounted wire-grid, since they’re quick, affordable, and sturdy. Steps: 1) source untreated pallets or wire panels, 2) sand rough edges, 3) cut to fit your space, 4) assemble with exterior screws and zip ties for extra support, 5) anchor into the ground or mount to a solid wall. Finish with a weatherproof seal or paint to protect the wood, and you’ve got a durable outdoor vine structure ready for climbers. For heavier climbers, upgrade to a cattle-panel frame anchored to posts for added strength.
What materials are best for homemade trellis designs that stand up to weather and everyday use in vertical gardening solutions?
Good options include exterior-grade cedar or redwood for a natural look, or powder-coated metal for durability. For budget-friendly routes, exterior-grade pine with a weatherproof seal also works well. Use galvanized or stainless screws and fasteners to resist rust, and choose a sturdy frame that distributes weight evenly. If you prefer lightweight options, PVC or welded wire panels can be used with solid anchors. Tip: seal wood before planting and avoid pressure-treated wood near edible crops for longer-lasting garden trellis projects.
How do I choose the right trellis for different climbing plants in small spaces?
Start by matching the plant to the trellis: light, flexible climbers like ivy or morning glory need less heavy support, while beans or roses require stronger, weight-bearing structures. Consider plant height, spread, and growth rate to decide if you need a freestanding unit or a wall-mounted panel. Place the trellis where it gets good sun and airflow, and in containers use a compact, durable design that fits your pot width. By planning ahead, you’ll give every plant solid climbing plants support and maximize your vertical gardening solutions in tight spaces.
What are quick maintenance tips to keep DIY trellises sturdy after installation?
After installation, do a quick seasonal check: tighten screws and braces, inspect anchors, and look for any loose connections. Apply a weatherproof seal or paint every year or two to protect wood from rain and sun. Trim back overgrown vines to reduce weight and airflow issues, and replace damaged panels or braces as needed. With simple upkeep, your garden trellis projects stay strong for many growing seasons, keeping your outdoor vine structures ready for new climbers.
Related Topics
trellis ideas
DIY climbing vines
vertical gardening
small space solutions
easy garden projects
outdoor vine structures
homemade trellis
beginner gardening
climbing plants support
afternoon projects
garden trellis designs
quick build trellis