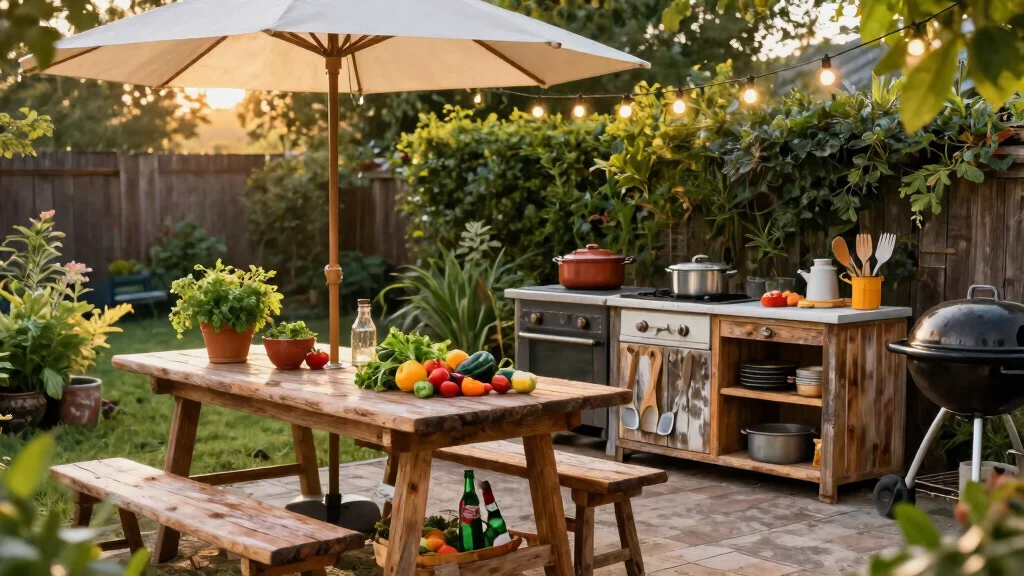
Creating an outdoor kitchen can feel like a daunting task, especially when you’re on a budget. Many of us dream about entertaining friends and family under the stars, grilling delicious meals, and enjoying the great outdoors. This desire has me searching for ways to build a beautiful outdoor cooking space that won’t break the bank. I want to help you transform your backyard into a stylish and functional area where cooking and entertaining feel special, yet still affordable.
If you’re someone who loves the idea of an outdoor kitchen but worries about the cost, this post is for you. You might be an avid gardener eager to create a charming space that complements your plants, or perhaps you’re a barbecue enthusiast wanting a great grilling setup for summer cookouts. No matter your motivation, you’ll find inspiration here that merges creativity with budget-friendly solutions.
I’ve pulled together 12 cheap outdoor kitchen ideas that look far more expensive than the materials suggest. These ideas are clever, simple, and perfect for adding charm to your patio. You’ll discover how to create a stunning outdoor cooking area that feels like a luxurious escape without spending a fortune. Let’s dive into these affordable projects and elevate your backyard for memorable gatherings and delicious meals!
Key Takeaways
– Explore affordable options like a reclaimed pallet bar or a DIY fire pit cooking station to create your outdoor kitchen without overspending.
– Utilize vertical space with a herb garden to add fresh flavors to your meals while enhancing your cooking space’s aesthetic.
– Simple designs, such as concrete countertops, can offer a modern look while being budget-friendly and durable.
– Upcycle furniture and materials, like using a wine barrel as a table, to personalize your outdoor area and keep costs low.
– Incorporate budget-friendly lighting solutions to set the mood for evening gatherings, making your outdoor kitchen inviting and cozy.
1. Reclaimed Pallet Bar
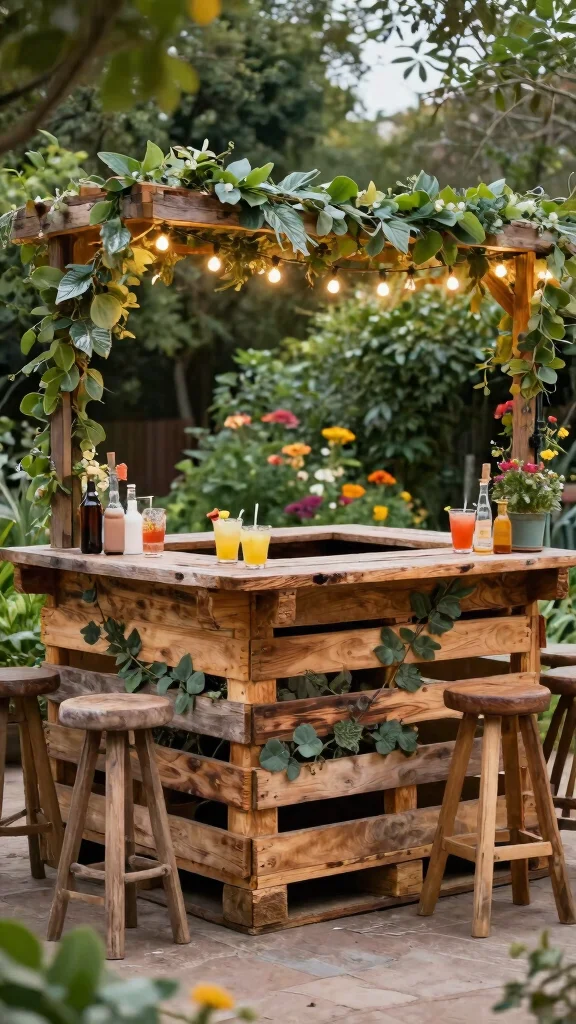
Are you looking for a stylish yet budget-friendly way to elevate your outdoor space? A reclaimed pallet bar might be just what you need! These versatile wooden pallets can be transformed into a chic bar that rivals those found in upscale venues, allowing you to enjoy drinks with friends while soaking up the sun. Plus, with minimal effort, you can customize the look to fit your personal style, making it a fun project to tackle.
Ingredients:
– Reclaimed wooden pallets
– Sandpaper
– Outdoor weatherproof sealant
– Paint or wood stain (optional)
– Bar stools (optional)
– Hanging shelves (optional)
Instructions:
1. Gather your reclaimed pallets.
2. Disassemble the pallets and sand down rough edges for a smooth finish.
3. Reassemble the pallets into a bar shape that suits your needs.
4. Apply outdoor varnish to seal and protect the wood.
5. Add stools and decorative items like hanging shelves for glassware and drinks.
FAQs:
– Can I use new pallets? Yes, but reclaimed materials give a more rustic look.
– Can I paint it a different color? Absolutely! Choose any color that fits your style.
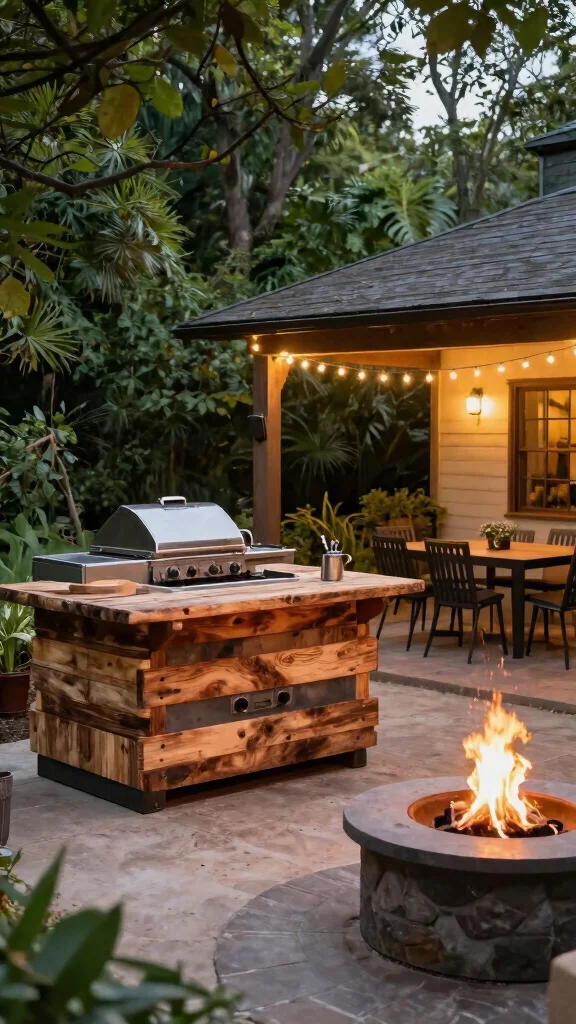
2. DIY Fire Pit Cooking Station
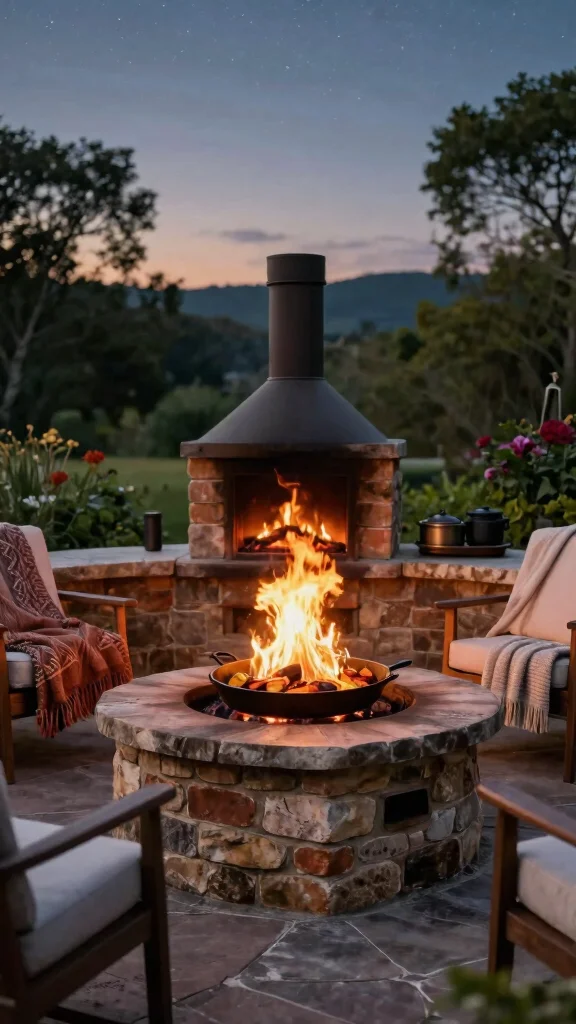
If you want to create warmth and a unique cooking experience in your backyard, a DIY fire pit cooking station is a fantastic solution. This simple setup allows you to grill and roast while enjoying cozy evenings around the fire. Not only does it provide a functional cooking area, but it also enhances the ambiance of your outdoor gatherings, making nights memorable.
Ingredients:
– Bricks or stones
– Metal grill grate
– Firewood or charcoal
– Firestarter
Instructions:
1. Choose a safe area in your yard, away from flammable materials.
2. Arrange the bricks or stones in a circular shape to form the fire pit.
3. Place a grill top made of metal grate over the fire pit.
4. Ensure safety by maintaining a clear space around the fire pit.
FAQs:
– Can I cook on the fire pit? Yes, just use a grill grate for cooking.
– Can I use it for s’mores? Absolutely! It’s perfect for roasting marshmallows.
3. Vertical Herb Garden
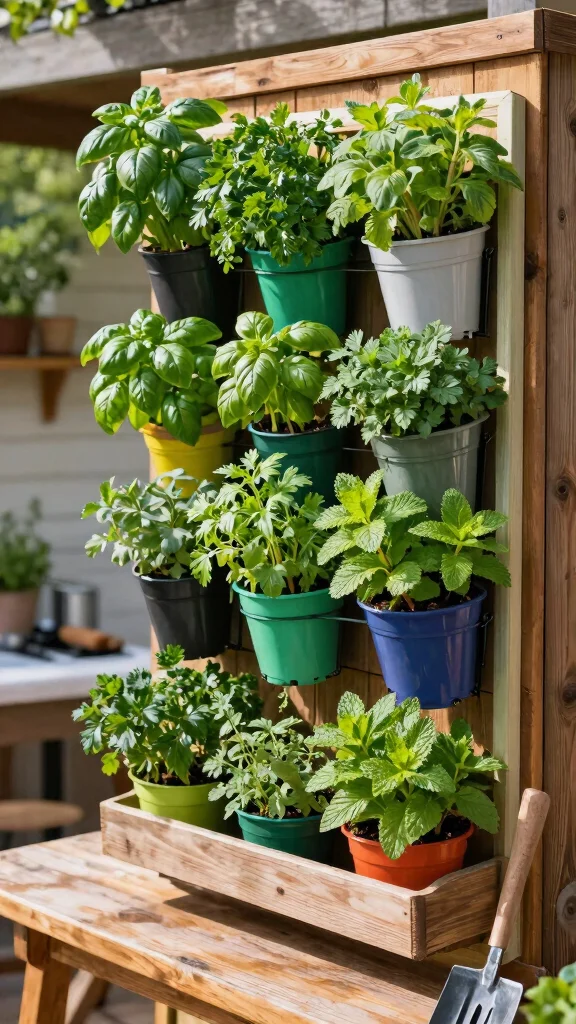
Want to add fresh flavors to your cooking while beautifying your outdoor space? A vertical herb garden is the perfect solution! This creative gardening option not only saves space but also allows you to grow your favorite herbs right at your fingertips. Imagine the convenience of snipping fresh basil or rosemary to enhance your dishes!
Ingredients:
– Wooden pallets or repurposed crates
– Potting soil
– Herb seedlings (like basil, rosemary, and thyme)
Instructions:
1. Select a sturdy structure for your vertical garden.
2. Fill containers with potting soil.
3. Plant your chosen herbs in the containers.
4. Water regularly and place in a sunny spot for optimal growth.
FAQs:
– Can I grow herbs indoors? Yes, as long as they get enough light.
– Can I use seeds instead of seedlings? Absolutely, just ensure they have enough time to grow.
Fun fact: as part of cheap outdoor kitchen ideas, a vertical herb garden on a wall saves up to 60% more space and can yield 2–3x more herbs per season than a traditional bed. Snip fresh basil or thyme right at your fingertips and spice your meals instantly.
4. Simple Concrete Countertops
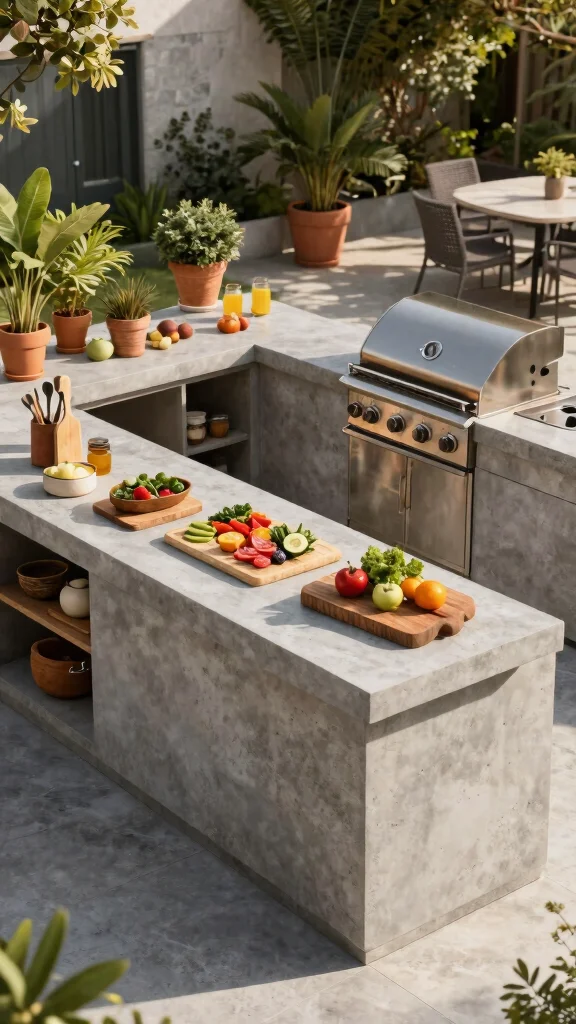
Looking to achieve a high-end look for your outdoor kitchen without breaking the bank? Simple concrete countertops might be the answer! They offer durability and a sleek aesthetic that can complement a variety of designs. With just a bit of effort, you can create stunning surfaces that are both functional and stylish for your cooking needs.
Ingredients:
– Concrete mix (suitable for outdoor use)
– Wooden frame
– Sealer (for protection)
Instructions:
1. Build a sturdy frame to pour the concrete into.
2. Mix the concrete according to package instructions.
3. Pour the mixture into the frame and smooth the surface.
4. Allow it to cure for 48 hours before removing the frame.
5. Seal the surface to protect it from stains.
FAQs:
– Can I color the concrete? Yes, you can add pigments for color.
– Is it hard to maintain? No, just clean it regularly and reseal as needed.
Fun fact: cheap outdoor kitchen ideas like concrete countertops can cut costs by up to 60% compared to premium stone, yet still look high-end. With proper sealing and a simple wooden frame, you’ll enjoy durable surfaces that last 10–15 years.
5. Outdoor Pizza Oven
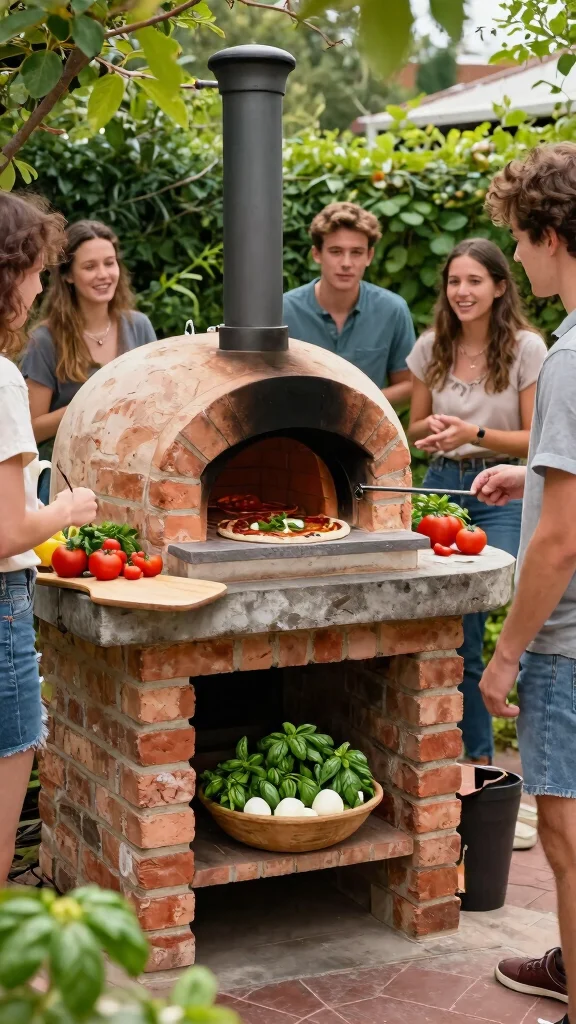
Imagine turning your backyard into the ultimate pizza party destination! An outdoor pizza oven can make that dream a reality. With a few materials, you can create a space for baking delicious pizzas, bringing your family and friends together for a fun culinary experience. The tantalizing aroma of freshly baked pizza will surely impress everyone!
Ingredients:
– Bricks or a DIY pizza oven kit
– Heat-resistant materials
– Pizza peels and tools
Instructions:
1. Build a solid base for the oven using bricks.
2. Construct the oven dome, leaving a door opening.
3. Insulate the oven for better heat retention.
4. Finish with a heat-resistant coating, if desired.
FAQs:
– Can I use it for other foods? Yes! You can bake bread and roast veggies too.
– How long does it take to heat up? It usually takes about 30-45 minutes to reach optimal temperature.
6. Galvanized Steel Sink
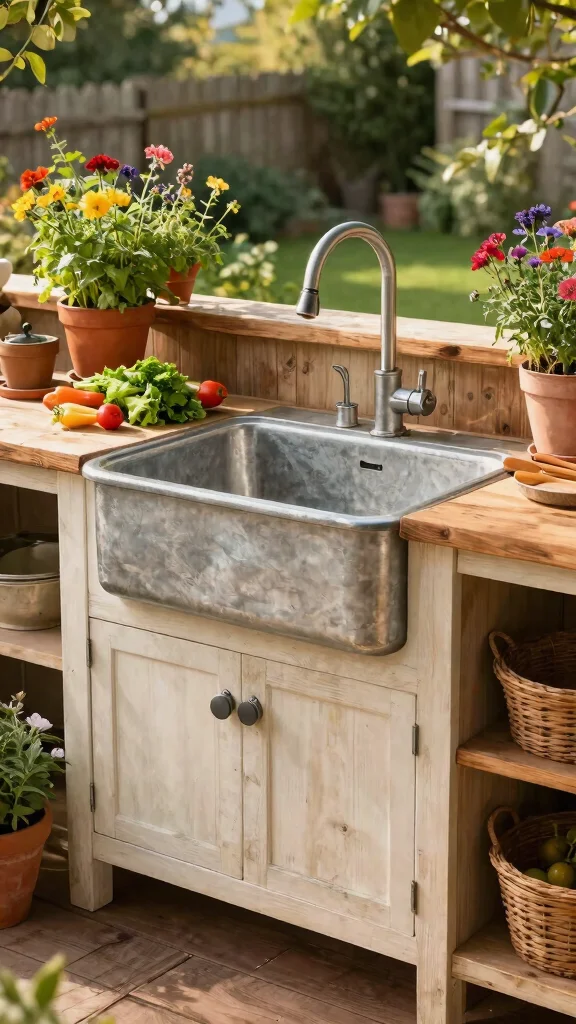
Enhancing your outdoor kitchen with a galvanized steel sink not only adds functionality but also a stylish rustic touch. These sinks are durable, weather-resistant, and perfect for easy cleanup while cooking outside. You can find affordable options at local stores, making it a practical addition to your space.
Ingredients:
– Galvanized steel sink
– Plumbing supplies for installation
– Natural stone or wood for surrounding
Instructions:
1. Choose a suitable location for your sink.
2. Install plumbing for water and drainage.
3. Secure the sink into place.
4. Finish with surrounding countertops for a polished look.
FAQs:
– Can I use it for washing dishes? Yes, it’s perfect for that!
– Does it rust easily? No, galvanized steel is designed to resist rust.
Cost Breakdown & Budget Planning
Cost Breakdown by Category:
– Materials/Products: $100 – $1,500
– Tools/Equipment: $50 – $300 (if you don’t have them already)
– Labor/Professional installation: $200 – $1,000 (if you prefer not to DIY)
– Optional extras: $50 – $500 (for extra features like lighting or decor)
Budget Tier Breakdown:
Basic Economy Tier $
– What’s included: This tier covers the bare minimum. You might go for simple items like a portable grill, basic tables, or repurposed materials for seating. You might be looking at using pallets or second-hand finds.
– Good for: Those who want to set up a functional cooking space without breaking the bank. It’s perfect for casual backyard gatherings or camping trips.
– Limitations: You may miss out on quality finishes or more durable materials. It might not have the aesthetic appeal you want for entertaining guests.
Mid-Range Tier $$
– What’s included: This tier offers a balanced option. You can invest in a sturdy grill, attractive countertops, and comfortable seating. Consider a small outdoor table or a compact outdoor sink.
– Good for: Families or entertainers looking for both functionality and style. It will provide a great atmosphere for dining and socializing.
– Best value for: Most people find this tier gives you a good mix of quality and cost. It’s not the cheapest but offers long-lasting enjoyment without overspending.
Premium Tier $$$
– What’s included: Expect high-end materials and features like a full outdoor kitchen setup. This may include a built-in grill, custom countertops, and ample storage.
– Good for: Serious outdoor chefs or those who entertain frequently. This tier is all about creating an upscale outdoor experience.
– Worth it if: You plan to invest in your outdoor area for years to come. If you often host gatherings, the investment is justified.
Money-Saving Tips:
– Repurpose materials: Look around your home or local yard sales for items you can upcycle. Old furniture or pallets can make great outdoor kitchen components.
– DIY projects: Instead of hiring professionals, take on some tasks yourself. Simple things like painting, assembling, or building can save you a lot.
– Shop sales: Keep an eye out for seasonal sales at home improvement stores. You might find discounts on grills, furniture, and accessories during the off-season.
– Buy used: Check online marketplaces for second-hand items. You can often find high-quality materials at a fraction of the cost.
Where to Splurge:
– Grills and Cookers: Investing in a good grill can make a significant difference. Look for reliable brands that will last through many outdoor cooking adventures.
– Countertops: If you can afford it, go for durable materials like stone or quartz. They not only look attractive but are also easier to clean and maintain over time.
– Comfortable Seating: Good seating will enhance your outdoor cooking experience. Investing in a few quality chairs or a dining set can change how you enjoy your space.
By following this budget guide, you can create a stunning outdoor kitchen that fits your needs and wallet. Remember, planning is key. Make a list of what you really want, prioritize your spending, and you’ll have an outdoor cooking space that feels luxurious without the hefty price tag!
7. Repurposed Furniture Grill Station
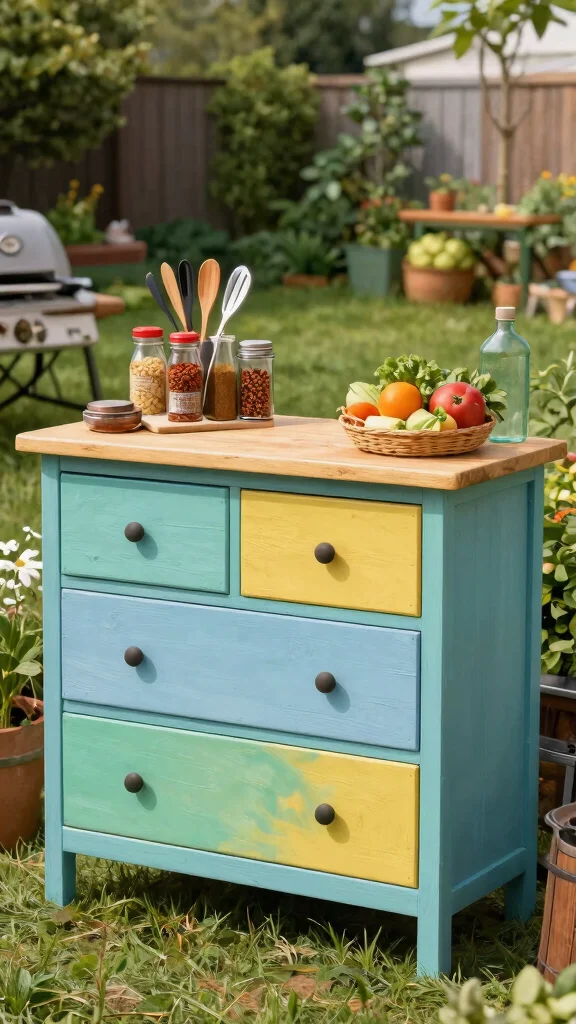
Do you have old furniture lying around? Transform it into a unique grill station! Repurposing pieces like an old dresser or table can add character to your outdoor kitchen while saving you money. With a bit of creativity, you can create a functional and stylish setup that will impress your guests.
Ingredients:
– Old dresser or sturdy table
– Sandpaper
– Paint or wood stain
Instructions:
1. Select a piece of furniture to repurpose.
2. Clean and sand down surfaces as needed.
3. Paint or refinish for a fresh look.
4. Organize your grilling supplies for easy access.
FAQs:
– Can I use any furniture? Yes, as long as it’s sturdy.
– Will it withstand outdoor conditions? Make sure to seal it to protect from the elements.
8. Compact Charcoal Grill
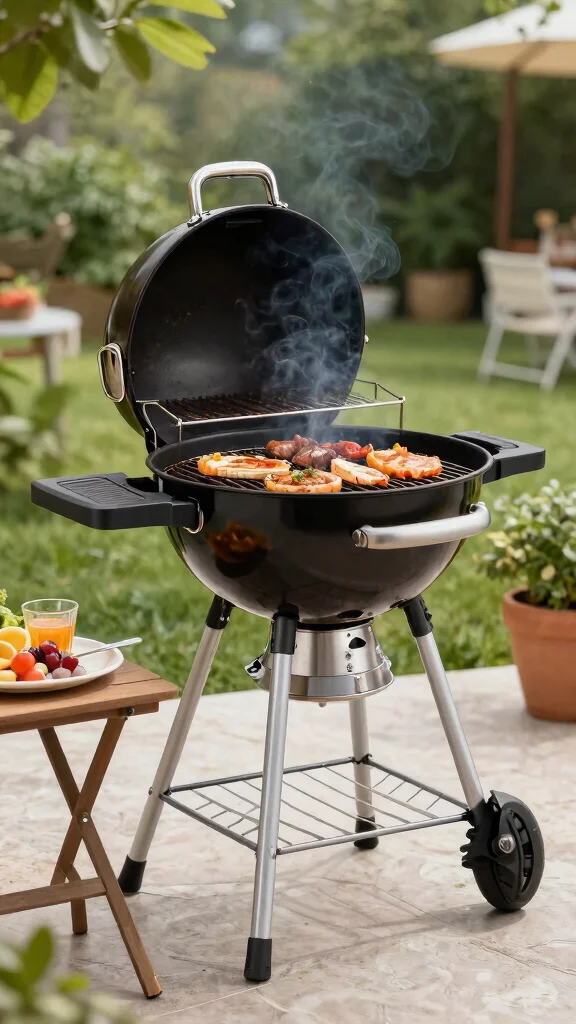
Searching for a space-saving grilling solution? A compact charcoal grill is ideal for small patios or balconies! These grills provide that delicious smoky flavor while being easy to transport and store. You can enjoy grilling with friends without needing a lot of space.
Ingredients:
– Compact charcoal grill
– Charcoal briquettes
– Grill tools
Instructions:
1. Set up the grill in a safe outdoor location.
2. Prepare the charcoal and light it according to instructions.
3. Allow the charcoal to heat before adding food.
4. Grill to your desired doneness and enjoy!
FAQs:
– Can I use it for larger gatherings? Yes, just plan accordingly with cooking times.
– Is it easy to clean? Yes, most grills have removable ash trays for easy cleanup.
9. Rollaway Outdoor Cart
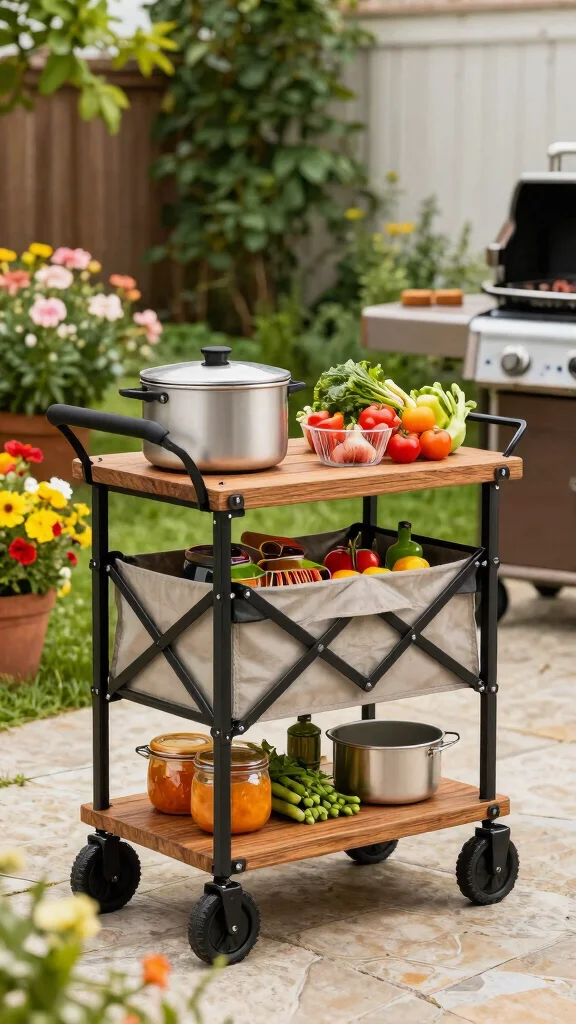
Looking for a versatile addition to your outdoor kitchen? A rollaway outdoor cart could be your answer! These mobile carts provide storage and prep space for your grilling tools and ingredients, making outdoor entertaining a breeze. You can easily find affordable options or even build your own from reclaimed materials.
Ingredients:
– Wood or metal materials
– Wheels for mobility
– Shelves or drawers for organization
Instructions:
1. Choose materials for your cart.
2. Assemble with shelves and open areas for grilling tools.
3. Add wheels for easy mobility.
4. Customize with paint or decorations as desired.
FAQs:
– Can I use it for serving food? Yes! It’s perfect for that too.
– Will it fit in my small space? Yes, there are many compact designs available.
10. Budget-Friendly Lighting
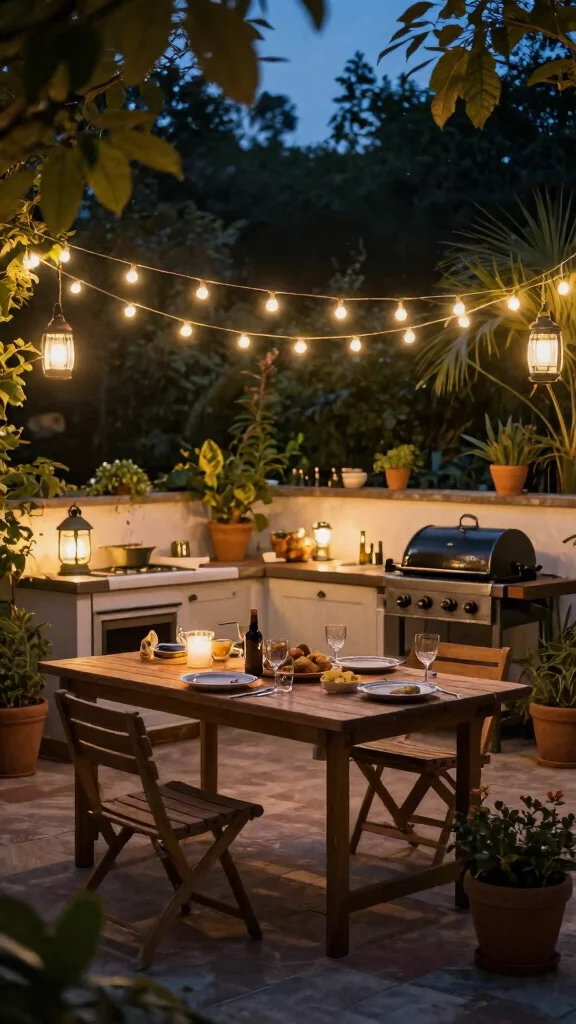
Want to create a warm and inviting atmosphere for your outdoor kitchen? Budget-friendly lighting can make all the difference! String lights, lanterns, and solar-powered options are inexpensive ways to brighten up your space, making evening gatherings more enjoyable. The right lighting can set the mood for a magical night under the stars.
Ingredients:
– String lights or lanterns
– Solar-powered lights (optional)
Instructions:
1. Choose your lighting style and design.
2. Install light sources around your outdoor kitchen area.
3. Ensure all wiring is safe for outdoor use.
4. Test lights and adjust for optimal illumination.
FAQs:
– Are solar lights effective? Yes, they can be very bright and energy-efficient.
– Can I use them during the day? Yes, they will charge but their main use is for nighttime.
11. Upcycled Wine Barrel Table
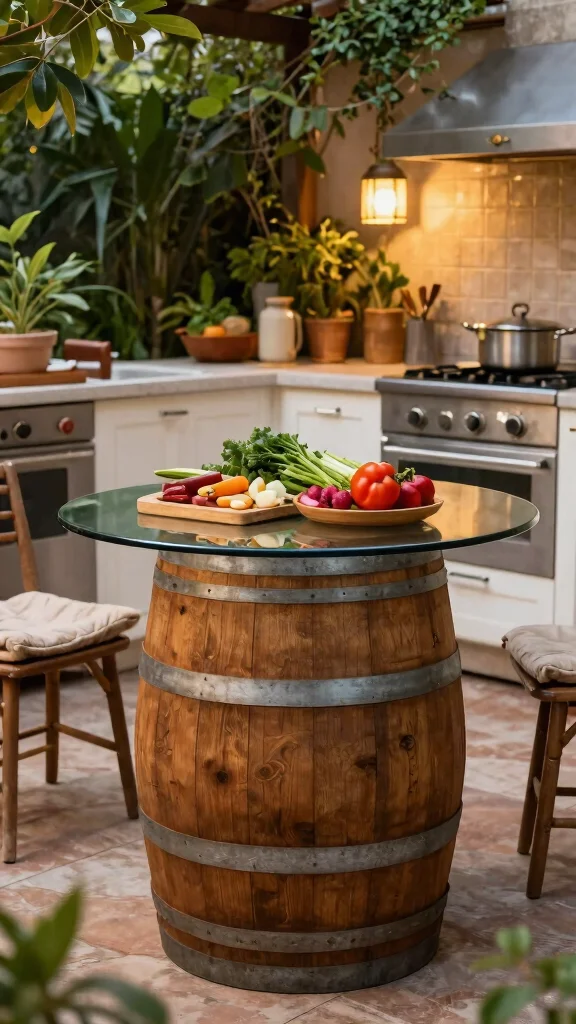
Want to add a touch of rustic charm to your outdoor kitchen? An upcycled wine barrel table can do just that! These unique tables not only serve as functional workspaces but also become conversation starters. With a little creativity, you can transform a wine barrel into an eye-catching piece that enhances your outdoor dining experience.
Ingredients:
– Wine barrel
– Outdoor varnish or sealant
– Optional glass top or decorative paint
Instructions:
1. Source a clean wine barrel.
2. Seal the wood with a suitable outdoor varnish.
3. Add a glass top for a polished finish if desired.
4. Place the table in your outdoor kitchen for use.
FAQs:
– Can I use it for dining? Yes, it’s perfect for that!
– Will it withstand weather conditions? Yes, with proper sealing, it can last outdoors.
Fun fact: A wine barrel table can seat 4–6 and costs less than many store-bought options. Save up to 40% on a rustic centerpiece while adding conversation-worthy charm.
12. Cozy Outdoor Dining Area
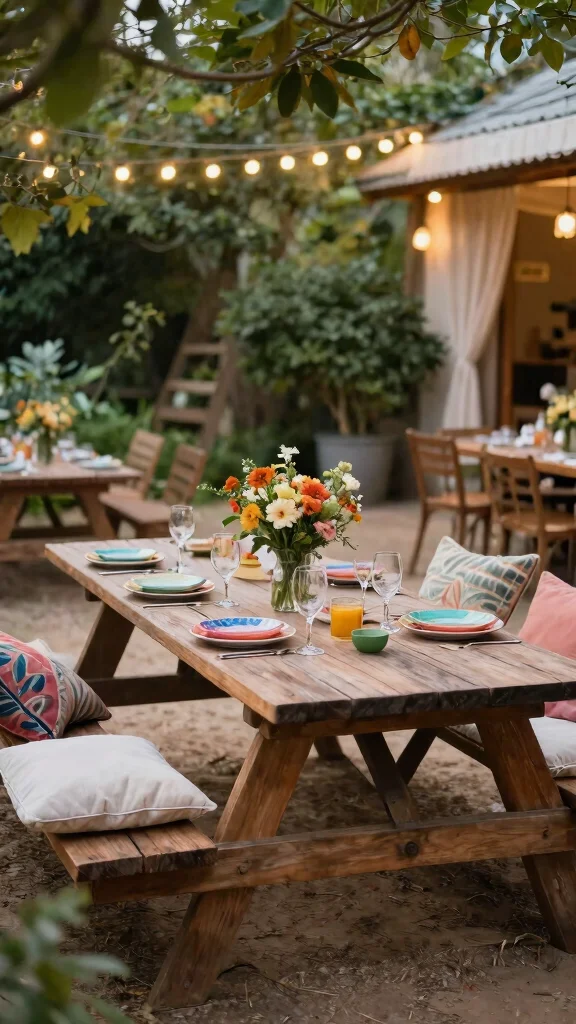
Creating a cozy outdoor dining area is the finishing touch for your outdoor kitchen! A designated space for meals enhances your outdoor experience, making every gathering special. Use simple picnic tables, colorful cushions, or even blankets on the grass to create a welcoming atmosphere that invites family and friends to relax and enjoy.
Ingredients:
– Picnic table or outdoor seating
– Cushions or throws
– Decorative centerpieces (like flowers or candles)
Instructions:
1. Choose a suitable location for your dining area.
2. Arrange seating and tables for a cozy layout.
3. Add decorative touches to enhance the space.
4. Ensure the area is clean and ready for use.
FAQs:
– Can I create a shaded area? Yes, consider using umbrellas or canopies.
– How can I keep it comfortable? Add cushions and throws for extra coziness.
Conclusion
Crafting an outdoor kitchen should be an enjoyable and liberating experience, showcasing your creativity and personality. These 12 cheap outdoor kitchen ideas not only help you stay within your budget but also elevate your cooking and entertaining game. You don’t need to spend a fortune to create a stunning space where memories are made.
Now, it’s time to roll up your sleeves and start experimenting with these ideas to create your perfect outdoor oasis!
Note: We aim to provide accurate product links, but some may occasionally expire or become unavailable. If this happens, please search directly on Amazon for the product or a suitable alternative.
This post contains Amazon affiliate links, meaning we may earn a small commission if you purchase through our links, at no extra cost to you.
Frequently Asked Questions
What are budget-friendly outdoor kitchen ideas that still look expensive?
There are plenty of cheap outdoor kitchen ideas that read luxe with smart choices. Start with a simple, durable base like concrete countertops or faux-stone panels, paired with stock outdoor cabinets and a compact grill. Use a cohesive color palette and weatherproof finishes to tie everything together.
Elevate the look with a small tile backsplash, outdoor-rated lighting, and a few well-chosen accessories. This approach delivers an outdoor kitchen design that feels high-end without the price tag, giving you a true budget-friendly cooking space you can be proud of.
How can I design an outdoor kitchen on a budget without sacrificing style?
Start with a clear plan: define the essentials (cook space, prep area, storage) and skimp on non-essentials. Choose budget-friendly materials like concrete countertops, tile, or powder-coated metal, and opt for modular cabinets you can expand later. Keep the layout simple—grill, prep, and sink in a single line to maximize space and flow.
Add style with affordable lighting, a weatherproof backsplash, and a few planters of fresh herbs. This is a solid outdoor kitchen design approach that stays a budget-friendly cooking space while leaving room for DIY outdoor kitchen upgrades.
What DIY projects can I tackle to create a cheap outdoor cooking space?
You can save a lot with smart DIY outdoor kitchen projects. Build an island from cinder blocks topped with a durable countertop (concrete or sealed plywood), then cover with a veneer or paint to look high-end. Install open shelving from reclaimed wood, and add a simple tile splash behind the prep area. Use a basic sink setup with a portable water container if you’re not connecting to plumbing yet. Finish with weatherproof paint and simple hardware. These budget-friendly steps let you achieve a stylish, functional space without professional help.
How can I make inexpensive materials look high-end?
Consistency is king. Choose a cohesive color palette and repeat a small set of materials for a unified look. Use stainless steel or brushed metal hardware, seal surfaces to protect against weather, and add a snug shade or pergola to frame the area. Good lighting and greenery go a long way for creative outdoor entertaining, turning affordable patio ideas into a space that feels designed rather than DIY.
What are common mistakes to avoid when building a budget outdoor kitchen?
Avoid common mistakes that derail a budget project. Without a careful plan, you’ll end up with a cramped layout, drainage problems, and weather-damaged surfaces. Don’t skip utilities or permits, and don’t underestimate the cost of weatherproofing and durable storage. Be realistic about what you can install yourself vs. hiring help, and always factor in maintenance. Keeping these in check helps you realize truly affordable patio ideas that support creative outdoor entertaining.
Related Topics
cheap outdoor kitchen
DIY outdoor kitchen
budget-friendly cooking
affordable patio ideas
outdoor kitchen design
creative entertaining
backyard makeover
easy DIY projects
outdoor cooking tips
summer gatherings
space-saving solutions
beginner friendly