When it comes to outdoor living, the idea of an outdoor kitchen really gets people excited. With summer approaching, many of us start dreaming of cooking and dining al fresco. I created this post because I believe that everyone should have the chance to enjoy a beautiful outdoor cooking space, no matter the budget.
If you’re someone who loves spending time outdoors or enjoys cooking, this guide is for you. You don’t need a lot of money to create a functional and stylish kitchen setup. With a little creativity and some wooden pallets, you can bring your outdoor cooking dreams to life. I’ve pulled together ten amazing pallet outdoor kitchen ideas that are not only budget-friendly but also eco-friendly. They showcase how you can turn simple materials into stunning outdoor features that you’ll love.
In this post, you’ll discover various DIY outdoor kitchen projects that are both practical and fun. From rustic grill stations to charming dining tables, you’ll see just how versatile pallets can be. You’ll get inspired to create your own outdoor oasis where you can entertain friends, enjoy family meals, or just unwind with a cup of coffee. Let’s dive in!
Key Takeaways
– Pallet outdoor kitchens are a cost-effective way to create a functional cooking space in your backyard.
– DIY outdoor kitchen projects enhance your outdoor living experience and foster creativity.
– You can repurpose pallets into various kitchen features, such as grill stations, dining tables, and even herb gardens.
– Each idea provides a unique aesthetic that can match different outdoor themes, from rustic to modern.
– Building your own outdoor kitchen can be a satisfying project that contributes to sustainable gardening practices.
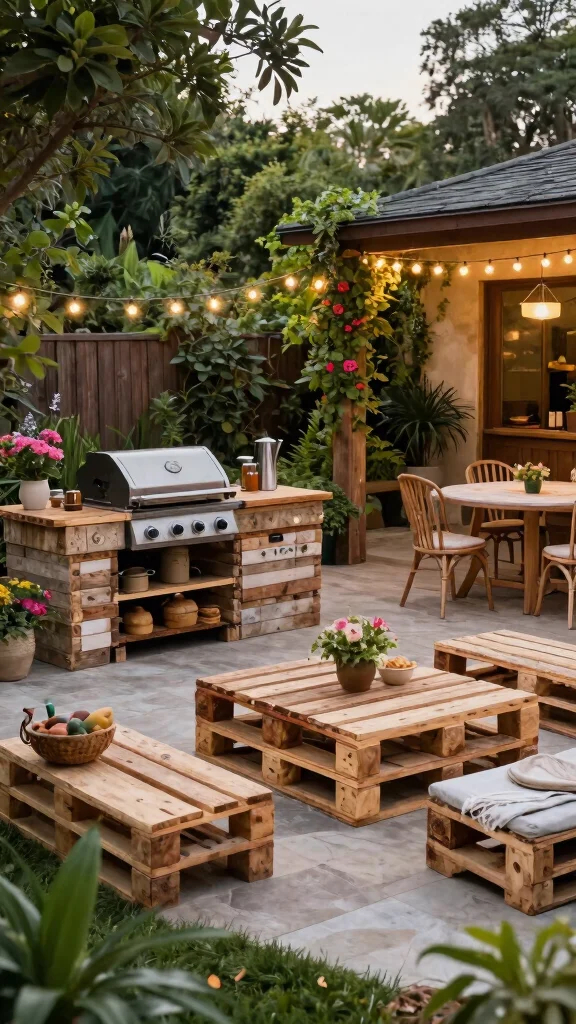
1. Rustic Pallet Grill Station
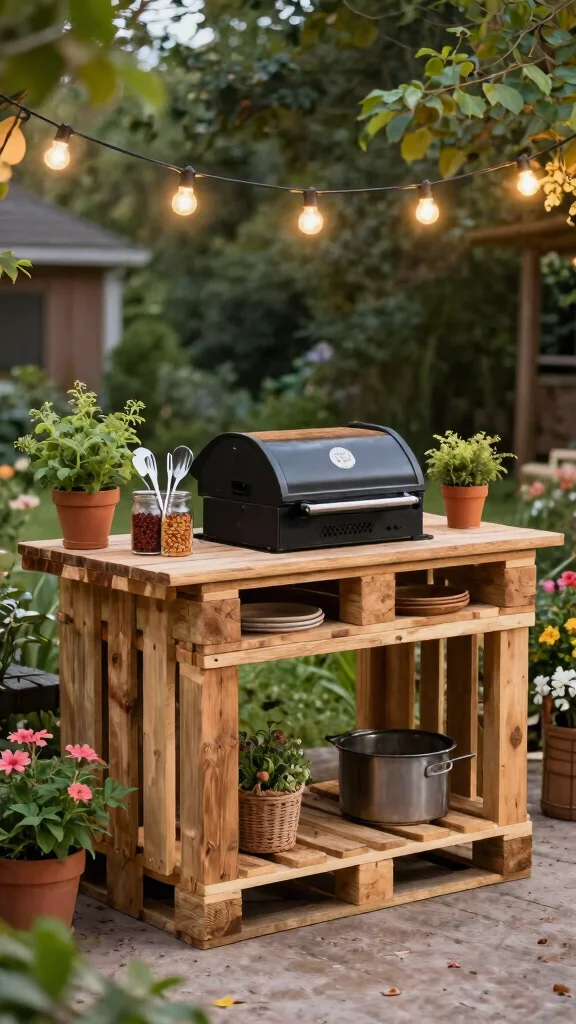
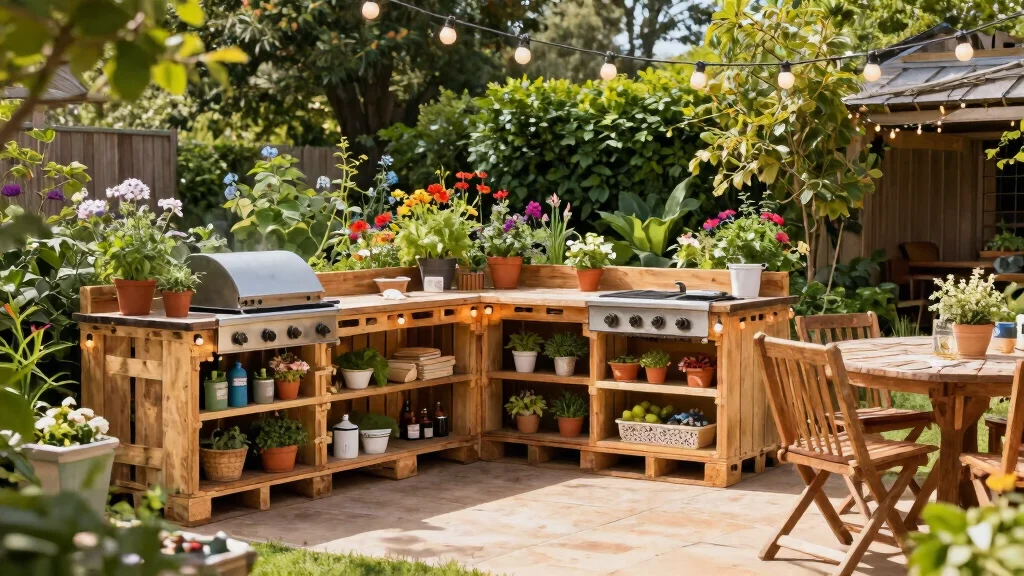
Craving the smoky aroma of grilled favorites? A rustic grill station made from pallets is the perfect solution for your outdoor cooking dreams. It not only establishes a welcoming vibe but also provides a practical space to prepare and enjoy meals with friends and family.
By arranging pallets, you create a sturdy base for your grill and ample storage for spices and utensils. Adding a prep counter allows you to get everything ready before cooking, while surrounding seating invites everyone to join in on the fun.
Using pallets is a budget-friendly and eco-conscious choice. Personalizing your grill station with reclaimed wood or decorative accents can enhance its charm.
Sand down the pallets for a smooth finish and coat them with weather-resistant paint to ensure they withstand the elements. You’re not just building a grill; you’re crafting a space for unforgettable moments.
Ingredients for the Perfect Grill Station:
– 4-6 pallets
– Weather-resistant wood stain
– Grill
– Storage boxes or crates
– Chalkboard for menus or daily specials
Instructions:
1. Choose a flat area in your garden for the grill station.
2. Stain or paint the pallets for a weatherproof finish.
3. Arrange pallets to create a stable base for your grill.
4. Add extra pallets for a prep counter and storage.
5. Decorate with hanging plants and herbs for an inviting touch.
FAQs:
– How long will pallets last outdoors? A: With proper sealing and treatment, pallets can endure several years outdoors.
2. Pallet Bar Setup
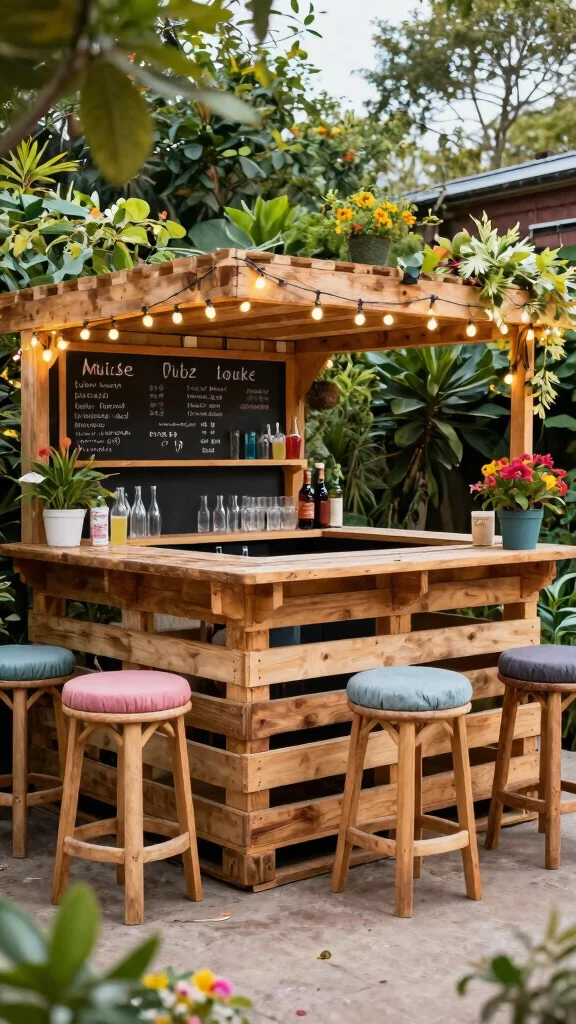
Looking to elevate your backyard gatherings? A DIY pallet bar setup is the perfect way to bring a fun and trendy vibe to your space. This creative bar is not only affordable but also customizable, making it an ideal spot for serving refreshing drinks during sunny afternoons.
Utilizing pallets allows you to create designated sections for beverages, garnishes, and glassware, transforming your outdoor area into a fully functioning bar. Enhance comfort by adding repurposed pallet stools or cushions for your guests to relax on while enjoying their drinks.
Adding a chalkboard menu can make your bar feel special and encourage creativity with rotating drink specials. Keep it practical by incorporating a cooler or mini-fridge for easy access to drinks, ensuring a smooth entertaining experience.
Ingredients for the Perfect Pallet Bar:
– 2-4 pallets for the bar structure
– Weather-resistant wood treatment
– Bar stools or pallet benches
– Decorative lights
– Chalkboard for menu
Instructions:
1. Select a convenient location easily accessible for guests.
2. Construct the bar frame using pallets, securing them together.
3. Stain or paint the pallets for a refined look.
4. Add shelves for glassware and drink essentials.
5. Decorate with lights and plants to create ambiance.
FAQs:
– How can I secure the pallets? A: Use brackets and screws to attach the pallets securely for stability.
Fun fact: A DIY pallet outdoor kitchen bar can cut hosting costs by up to 60% compared to store-bought setups. It also takes under a weekend to assemble.
3. Pallet Pizza Oven
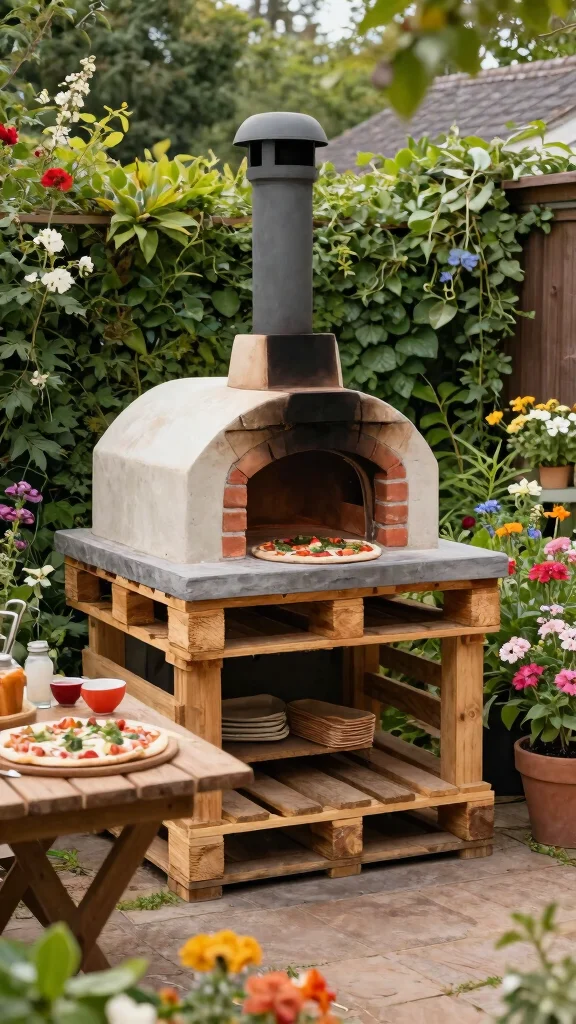
Ever dreamt of crafting wood-fired pizzas in your own backyard? Building a pallet pizza oven offers you the chance to indulge in authentic Italian flavors without breaking the bank. This project is surprisingly manageable and will surely impress your guests with delicious homemade pizzas.
Start with a sturdy pallet foundation, then create an insulated area for the oven on top. Adding a small chimney will help smoke escape while ensuring your cooking space remains efficient. This setup opens the door to endless culinary creativity, making pizza night a highlight of your week.
Consider finishing your pizza oven with decorative stones or tiles for that professional touch. Ensure you use heat-resistant materials internally for safe cooking results.
Ingredients for the Perfect Pallet Pizza Oven:
– 6-8 pallets for the base and structure
– Firebrick or heat-resistant tiles
– Cement for the oven interior
– A small chimney pipe
– Decorative stones or tile for façade
Instructions:
1. Build a stable base using pallets and secure them together.
2. Construct the pizza oven structure on top, leaving space for the chimney.
3. Line the inside with firebrick or heat-resistant tiles.
4. Add a chimney for smoke ventilation.
5. Finish the outside with decorative stones or tiles for an appealing look.
FAQs:
– How long will it take to build? A: Depending on your skill level, it may take a weekend or two to complete.
4. Vertical Pallet Herb Garden
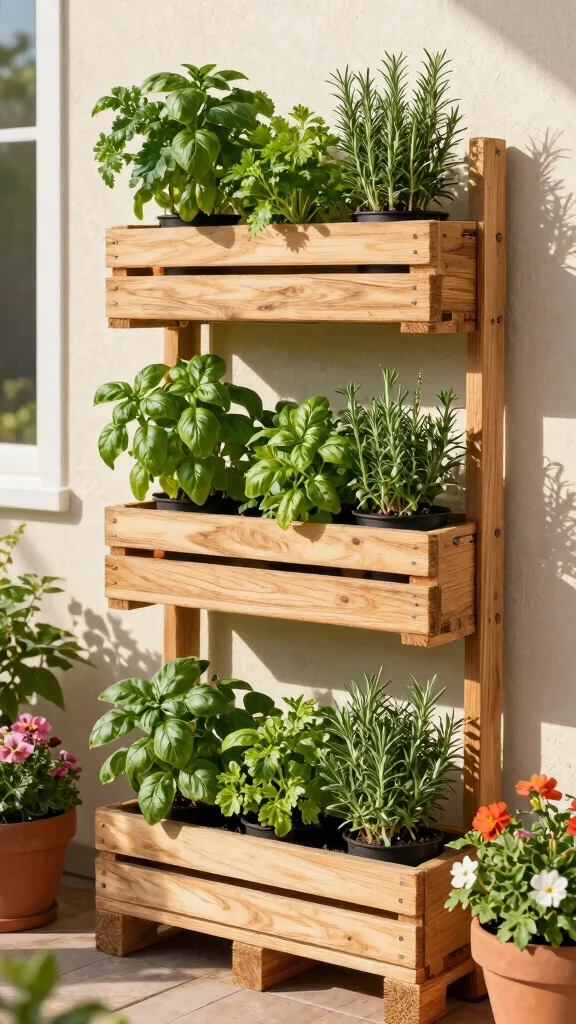
Want to spice up your outdoor kitchen? A vertical herb garden made from pallets is a fantastic way to incorporate fresh flavors into your cooking while saving space. This clever setup adds a vibrant touch to your kitchen area and is incredibly easy to maintain.
By attaching pallets to a wall or fence, you can create rows of lush herbs that are readily accessible for all your cooking needs. Growing herbs like basil, cilantro, and rosemary not only enhances the taste of your dishes but also brings delightful aromas to your outdoor space.
Vertical gardens are visually striking and can become a focal point of your kitchen. Ensuring proper drainage by adding landscape fabric will keep your herbs healthy and thriving.
Ingredients for the Perfect Vertical Herb Garden:
– 1-2 pallets
– Basic potting soil
– Herb plants of your choice
– Landscape fabric
– Hooks for hanging
Instructions:
1. Choose a sunny spot on a wall or fence.
2. Secure the pallets vertically using screws or brackets.
3. Line the bottom of each section with landscape fabric.
4. Fill with potting soil and plant your chosen herbs.
5. Water regularly and enjoy fresh herbs!
FAQs:
– What herbs are best for a vertical garden? A: Basil, parsley, cilantro, and thyme are excellent choices for easy access while cooking.
5. Simple Pallet Dining Table
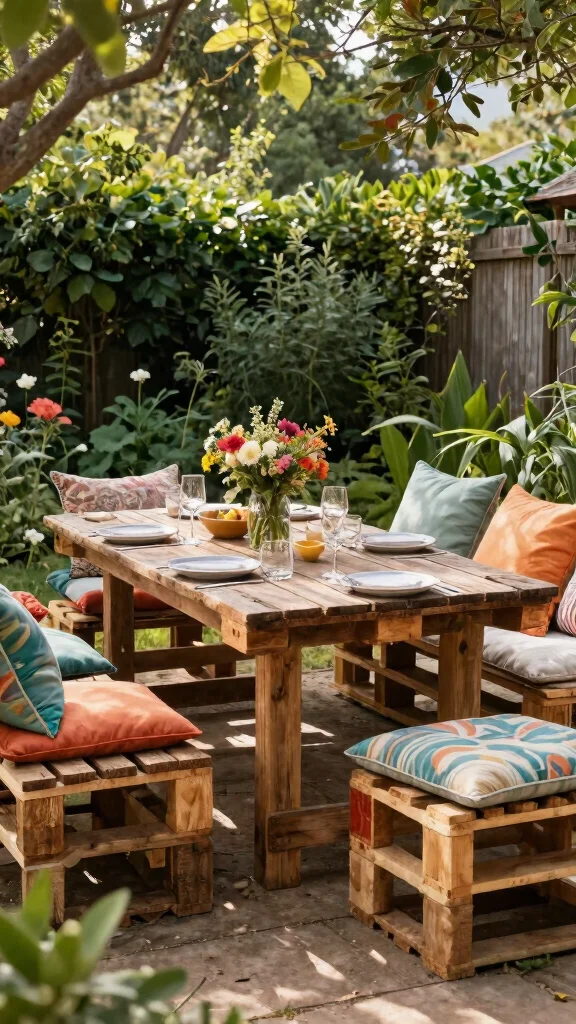
No outdoor kitchen feels complete without a cozy dining area. A simple pallet dining table can be effortlessly created to provide a warm space for enjoying meals outdoors. With just a few pallets, you can craft a sturdy table tailored to your family’s needs.
Add some cushions or throw pillows to enhance comfort and create a relaxing atmosphere where you can savor meals while basking in the sun. Personalizing your table with vibrant colors or protective finishes can keep it looking fresh and inviting.
Stability is key; reinforcing the table legs with extra pallets will ensure it stands strong. This dining table becomes the perfect gathering spot for friends and family to connect over delicious food.
Ingredients for the Perfect Pallet Dining Table:
– 4-6 pallets
– Sandpaper for smoothing
– Weather-resistant paint or stain
– Cushions or pillows for seating
Instructions:
1. Choose pallets of similar size for a uniform table.
2. Sand down any rough edges for safety.
3. Stack two or three pallets to form the tabletop and secure them.
4. Attach legs using additional pallets for support.
5. Paint or stain for protection and aesthetics.
FAQs:
– How do I keep the table from wobbling? A: Ensure all pallets are of equal height and securely fastened together.
Did you know? A pallet outdoor kitchen setup can start with a simple pallet dining table built from 2 pallets and under $25 in materials. It seats your family comfortably and leaves room for cushions and color.
Cost Breakdown & Budget Planning
Building a pallet outdoor kitchen can be a rewarding project that doesn’t break the bank. To help you plan your spending, here’s a detailed budget guide.
Cost Breakdown by Category:
– Materials/Products: Expect to spend between $100 to $500 depending on your kitchen’s size and complexity. This includes pallets, paint, and other supplies needed for construction.
– Tools/Equipment: If you don’t have tools, budget around $50 to $300. Basic tools include a saw, hammer, screws, and a drill. You might borrow or rent tools to save costs.
– Labor/Professional Installation: If you want to hire help, expect costs from $200 to $1,000. DIY is the cheaper option but can require some skill and time.
– Optional Extras: Consider additional items like outdoor lighting or a grill. This could add another $50 to $300 to your overall budget.
Budget Tier Breakdown:
Basic Economy Tier $
– What’s included: This tier covers the minimum viable option, including a simple grill station and a few pallet seats. You might use recycled pallets with minimal refinishing.
– Good for: Those looking to dip their toes into outdoor cooking without heavy investment.
– Limitations: You’ll miss out on custom features like a sink or proper storage, making it less functional.
Mid-Range Tier $$
– What’s included: This balanced option features a grill station, a small dining table, and a vertical herb garden. It also includes some refinishing for aesthetics.
– Good for: Families or friends who want to enjoy outdoor gatherings without spending a fortune.
– Best value for: Most people! It strikes a good balance between cost and functionality.
Premium Tier $$$
– What’s included: All features are included, such as a full kitchen setup with a sink, storage options, and a customized bar area. High-quality pallets and finishes are used here.
– Good for: Serious outdoor cooks who spend a lot of time entertaining outside.
– Worth it if: You plan to make this your primary cooking space and want it to last for years.
Money-Saving Tips:
– Shop local: Look for free or cheap pallets from local businesses. Many places give them away instead of discarding them, saving you money on materials.
– Reclaim materials: Use reclaimed wood, bricks, or stones for countertops and fixtures instead of buying new materials.
– DIY where possible: Try to do as much of the work yourself. YouTube has plenty of tutorials for building and installing pallet furniture.
– Plan ahead: Before starting, create a detailed plan to avoid unnecessary purchases and make the most of your materials.
Where to Splurge:
– Quality tools: Investing in good tools can save you time and frustration. They’ll last longer and give you better results.
– Outdoor appliances: If you plan to use appliances like a pizza oven or a grill often, spend a bit more here for reliability and performance.
– Sealing and finishing materials: Use high-quality weatherproof sealants. This helps protect your investment against the elements and extends the life of your outdoor kitchen.
With careful planning and smart spending, your pallet outdoor kitchen can be a budget-friendly project that brings joy to your backyard gatherings. Follow these guidelines, and you’ll have an outdoor cooking space that’s both functional and stylish. Happy building!
6. Pallet Sink Station
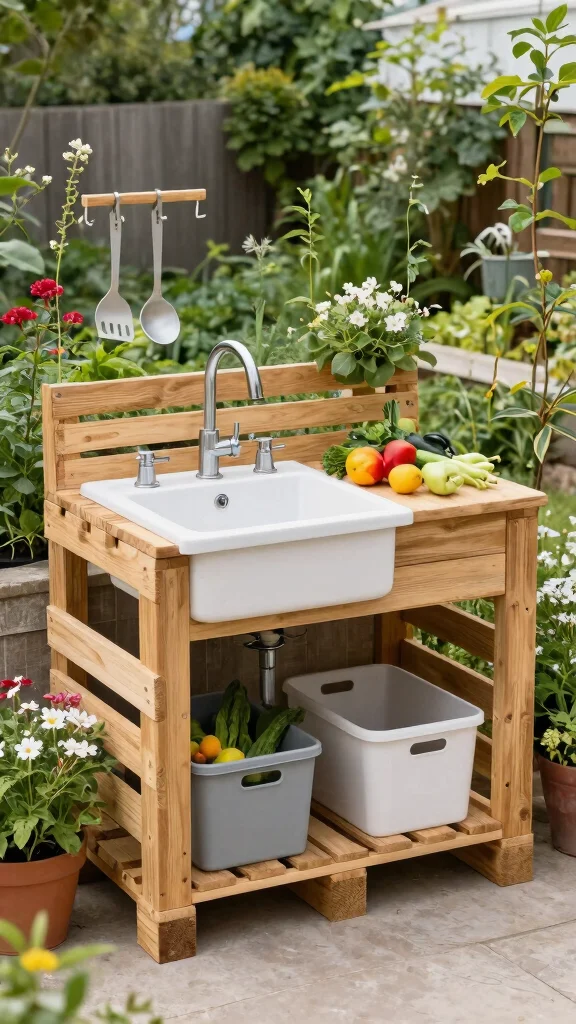
No outdoor kitchen is complete without a practical sink station! With pallets, you can build a stylish and functional sink area that simplifies outdoor cooking. A pallet sink station can feature a washing basin, drying area, and storage underneath for cleaning supplies.
This setup keeps your kitchen organized and enhances your cooking experience by making it easier to wash vegetables or clean dishes. Adding a rainwater collection system can make your sink eco-friendly and self-sufficient.
Make sure to secure the plumbing properly to avoid leaks, and use a weather-resistant finish on the pallets to extend their lifespan. Your pallet sink station is a game-changer for convenience and efficiency in outdoor cooking.
Ingredients for the Perfect Pallet Sink Station:
– 2-4 pallets for structure
– Sink basin
– Plumbing supplies
– Storage bins or crates
– Weather-resistant finish
Instructions:
1. Choose a location close to your cooking area.
2. Build a frame using pallets and secure them together.
3. Install a sink basin and connect plumbing.
4. Add storage space underneath for cleaning supplies.
5. Stain or paint the pallets for protection.
FAQs:
– Can I connect the sink to my home water supply? A: Yes, with proper plumbing, you can connect it directly to your home water system.
7. Pallet Side Table
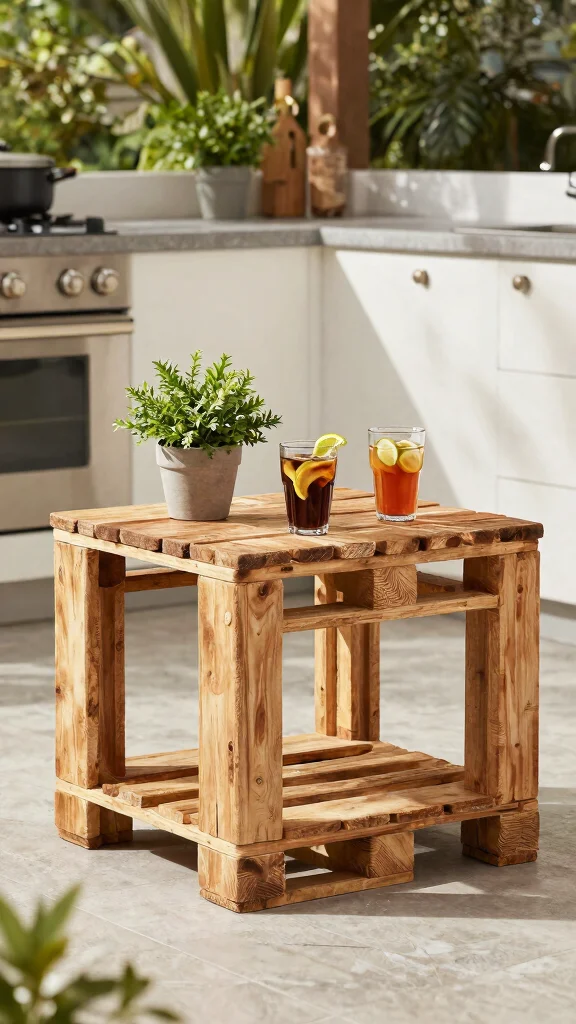
Sometimes, the little details matter, like having a handy side table next to your outdoor kitchen. A simple pallet side table is perfect for holding drinks, plates, or even a charming potted plant. Building this table from pallets is easy and requires minimal materials, making it a practical addition.
This piece serves a functional purpose and enhances the overall aesthetic of your outdoor cooking setup. You can leave it in its natural state for a rustic look or paint it to match your kitchen decor.
Adding wheels can make the table mobile, allowing you to reposition it as needed. Sanding down rough edges and applying a weatherproof finish will keep your table looking great through the seasons.
Ingredients for the Perfect Pallet Side Table:
– 1-2 pallets
– Wheels (optional)
– Weather-resistant finish
– Sandpaper
Instructions:
1. Choose a pallet of suitable size for a side table.
2. Sand down any rough edges for a smooth finish.
3. If using, attach wheels to the bottom for mobility.
4. Optionally paint or stain the table for aesthetics.
FAQs:
– How stable will a pallet table be? A: If constructed properly, a pallet table can be very stable and long-lasting.
8. Pallet Fire Pit Table
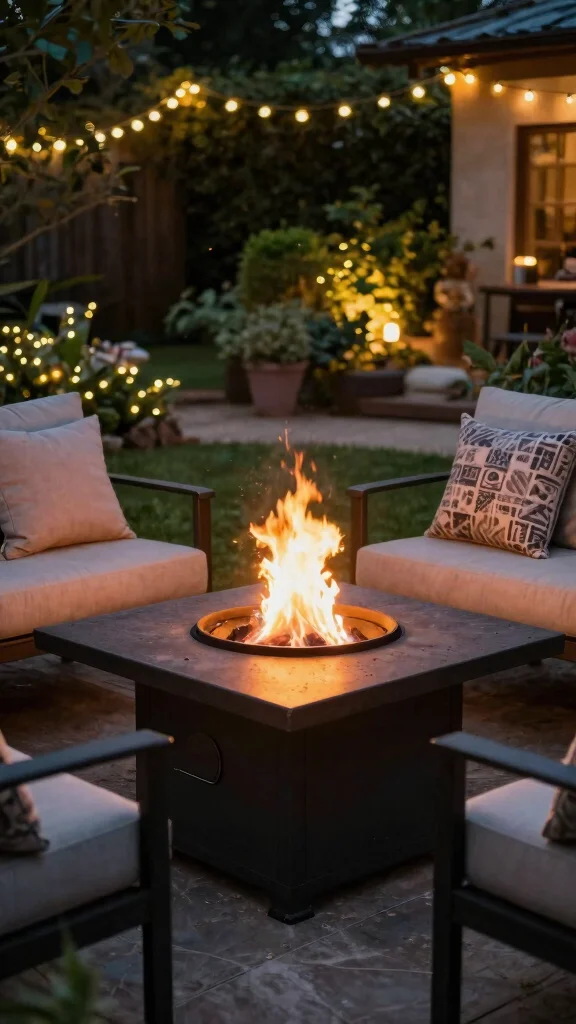
Looking to add warmth and ambiance to your outdoor space? A pallet fire pit table combines functionality with coziness, creating an inviting area for gatherings, especially on chilly evenings. Building this table from pallets is straightforward and offers a stylish focal point for your patio or backyard.
Using pallets as a base, you can install a fire bowl or pit in the center, providing warmth while you and your loved ones share stories and laughter under the stars. Surround the fire with comfortable seating to encourage relaxation and enjoyment.
Ensure safety by using heat-resistant materials around the fire pit area, and consider adding a cover when not in use to protect it from the elements. This pallet fire pit table becomes the heart of memorable outdoor gatherings.
Ingredients for the Perfect Pallet Fire Pit Table:
– 4-6 pallets
– Fire bowl or pit
– Heat-resistant materials
– Seating options (pallet seating or chairs)
Instructions:
1. Choose a suitable location with ample space.
2. Build a stable base using pallets.
3. Ensure the fire pit is secured and well-ventilated.
4. Arrange seating around the fire pit for comfort.
5. Optionally, decorate with outdoor cushions and blankets.
FAQs:
– Is it safe to have a fire pit on a wooden table? A: Yes, as long as heat-resistant materials are used and maintained properly.
9. Pallet Coffee Station
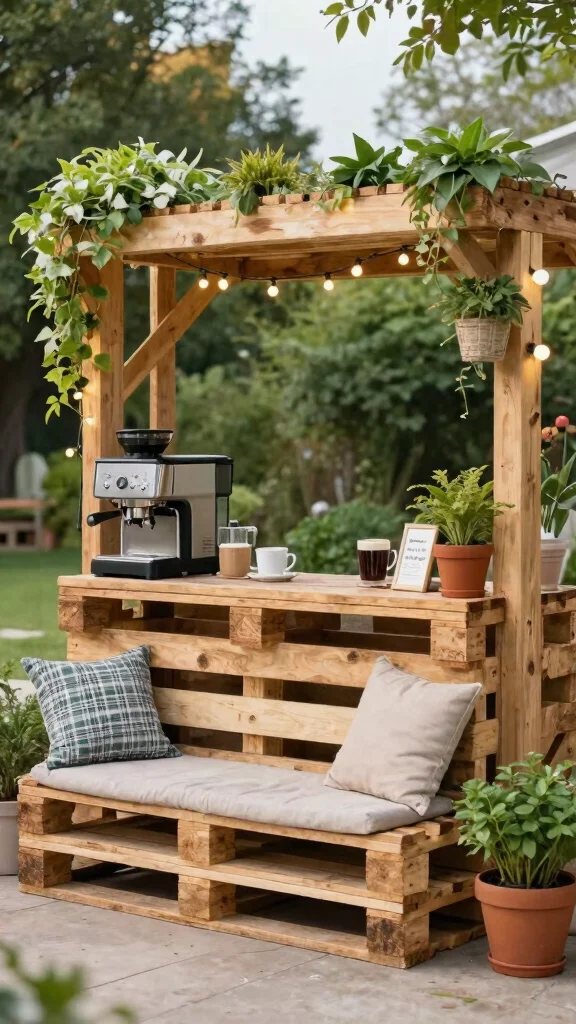
Are you a coffee lover looking to enjoy your brew outdoors? Creating a cozy coffee station in your outdoor kitchen is a wonderful way to savor your favorite drinks while soaking in nature. With just a few pallets, you can set up a dedicated area for brewing coffee and storing your essentials.
This coffee station can feature a pallet base for your coffee maker, storage for beans and cups, and even some seating for sipping your morning coffee. Adding charming decor like fairy lights or potted flowers will enhance the relaxing atmosphere as you enjoy your fresh brew.
Personalize your space with your favorite mugs or a chalkboard for coffee specials to give it a unique touch. Ensuring easy access to water and a shaded area will make your coffee experience even more enjoyable.
Ingredients for the Perfect Pallet Coffee Station:
– 2-3 pallets for the structure
– Coffee maker
– Storage for coffee supplies
– Decorative elements (like plants or lights)
Instructions:
1. Choose the best spot that’s convenient for brewing coffee.
2. Build the base using pallets and secure them together.
3. Add shelves for storage of your coffee supplies.
4. Decorate with plants and lights for charm.
FAQs:
– How can I keep my coffee supplies organized? A: Use small bins or jars to store different coffee varieties and accessories neatly.
Coffee lovers can brew happiness outdoors with a simple pallet coffee station in your pallet outdoor kitchen. A pallet base, mug shelf, and fairy lights turn mornings into a cozy ritual—even tiny patios feel inviting.
10. Pallet Outdoor Storage Unit
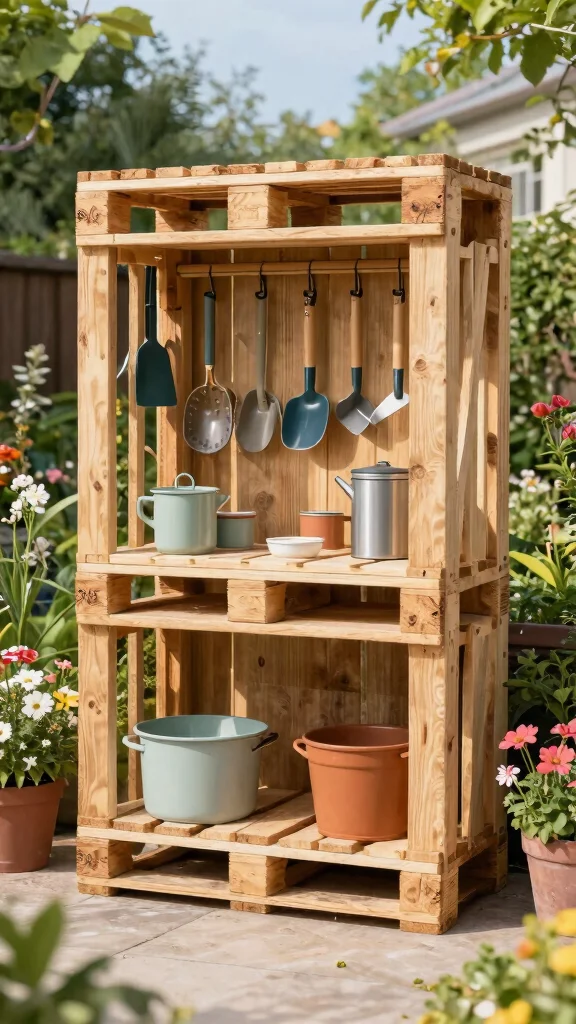
Maintaining an organized outdoor kitchen is essential, and a pallet storage unit is a practical solution to keep everything tidy! This unit allows you to store gardening tools, cooking supplies, or anything else you want to keep handy while maximizing space.
Building a storage unit from pallets is simple and can be customized to fit your specific needs. You can incorporate shelves, bins, or hooks for easy access to your essentials, ensuring your outdoor kitchen stays clutter-free.
Using different pallet sizes can create a visually appealing storage unit, adding character to your space. Weatherproofing your storage unit will protect your tools and supplies from the elements, keeping everything in great shape.
Ingredients for the Perfect Pallet Outdoor Storage Unit:
– 4-6 pallets
– Hooks or storage bins
– Weather-resistant finish
– Sandpaper
Instructions:
1. Choose a location that is easily accessible from your outdoor kitchen.
2. Create a frame using pallets and secure them together.
3. Add shelves or bins for organization.
4. Finish with a weather-resistant stain or paint to protect from moisture.
FAQs:
– How do I prevent moisture build-up inside? A: Ensure proper ventilation to allow airflow within the storage unit.
Conclusion
Creating a pallet outdoor kitchen is a fun, creative, and budget-friendly way to enhance your garden space. Each of these ideas not only brings functionality but also adds character and charm to your outdoor cooking experience.
Whether you prefer a rustic grill station, a cozy coffee area, or an elegant fire pit table, there’s no limit to what you can create with a little creativity and some upcycled pallets. So gather your materials, get inspired, and start building your outdoor kitchen paradise today!
Note: We aim to provide accurate product links, but some may occasionally expire or become unavailable. If this happens, please search directly on Amazon for the product or a suitable alternative.
This post contains Amazon affiliate links, meaning we may earn a small commission if you purchase through our links, at no extra cost to you.
Frequently Asked Questions
Question: What exactly is a pallet outdoor kitchen and why is it a budget-friendly option for gardeners?
A pallet outdoor kitchen is a compact cooking and prep area built largely from reclaimed pallets, designed for easy DIY assembly and low cost. It fits well with budget-friendly gardening goals and lets you create a practical DIY outdoor kitchen setup without a big renovation.
To get started, map your space, choose heat-treated pallets, and assemble a simple island with a durable countertop. Add a prep surface, storage shelves, and a small grill or portable burner. With just a few pallets, basic hardware, and weatherproof finishing, you can build a functional pallet outdoor kitchen that supports outdoor cooking setups and scales with your garden.
Question: How can I safely prepare and treat pallets for a pallet outdoor kitchen to avoid toxins and ensure food safety?
Avoid pallets that show chemical treatments or have unknown coatings. Look for heat-treated (HT) stamps and avoid pressure-treated wood. Wash and scrub pallets with mild soap, rinse, and let dry, then sand rough spots. Remove protruding nails and replace damaged slats. For food-contact surfaces, limit direct wood exposure; cover prep areas with a food-safe sealant, or use a separate cutting board or stainless steel countertop. Finish with an exterior-grade, food-safe sealer or mineral oil on any wood that will touch foods indirectly. By starting with safe wood and sealing properly, you keep your pallet outdoor kitchen food-safe and durable.
Question: What are some easy pallet furniture ideas to complete a DIY outdoor kitchen setup on a budget?
Here are some easy pallet furniture ideas to complete a budget-friendly outdoor kitchen: build a pallet island that doubles as prep space, attach casters to move it around, and add a wall-mounted shelf from pallet slats for spices and utensils.
For seating, create simple pallet benches with outdoor cushions or convert a second pallet into a bar-height counter. Plant herb planters from cut sections of pallets to keep fresh herbs handy for outdoor cooking setups. Finish with weatherproof paint or sealant to extend life and keep a cohesive look with your garden.
Question: How can I design a durable and weather-resistant DIY outdoor kitchen using pallets?
Start with a clear layout: prep area, grill zone, waste/recycling corner, and storage. Choose a sturdy countertop option like cement board or rust-resistant metal, and seal wood surfaces with exterior-grade, water-resistant finishes. Elevate the structure slightly on blocks or caster wheels for airflow and maintenance. Add a simple roof or shade to protect from sun and rain, and ensure proper drainage around the base. With these practical steps, your pallet outdoor kitchen stays functional for years and works well with any outdoor cooking setups.
Question: What are the best tips to keep your pallet outdoor kitchen sustainable and budget-friendly over time?
Keep sustainability at the core by reusing pallets, choosing upcycled components, and embracing sustainable garden projects. Use solar-powered lighting, rainwater harvesting for cleaning, and herb planters made from pallet sections to cut waste and costs. Regular maintenance—cleaning, sanding, and applying a fresh coat of outdoor sealant—extends life without a full remodel. With thoughtful upgrades and smart storage, your pallet outdoor kitchen remains a budget-friendly gardening win.
Related Topics
pallet outdoor kitchen
DIY outdoor kitchen
budget-friendly gardening
upcycled decor
sustainable projects
outdoor cooking
pallet furniture ideas
easy DIY
backyard makeover
eco-friendly design
beginner friendly
summer entertaining