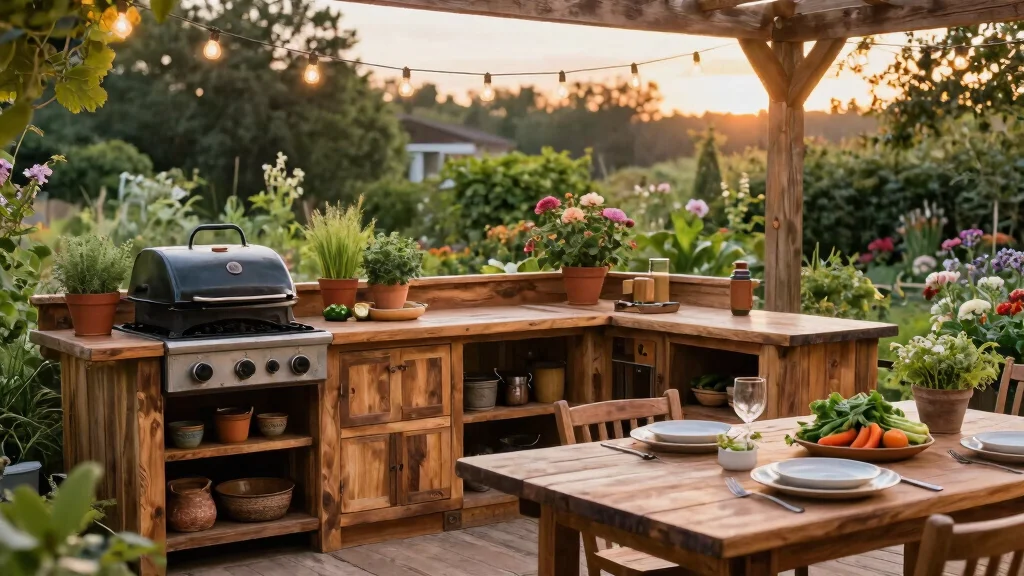
Creating a rustic outdoor kitchen on a budget can feel daunting, but it doesn’t have to be. I made this post because I know how much joy an inviting outdoor cooking space can bring. Picture this: friends gathered around, laughter filling the air, and delicious meals sizzling on the grill. Yet, many of us hesitate because we think it will cost a fortune to achieve that charming backyard kitchen vibe.
If you’re someone who loves to entertain and enjoys the great outdoors, this post is for you. You’ll find ideas that are not only affordable but also creative and unique. I pulled together 11 fantastic DIY rustic kitchen ideas that will have your outdoor space looking like it cost three times more than it actually did. Get ready to inspire your backyard with budget-friendly garden ideas that transform upcycled materials into a cozy cooking haven!
Key Takeaways
– Discover 11 creative ideas for building a rustic outdoor kitchen without breaking the bank.
– Learn how to incorporate upcycled materials like reclaimed wood and old doors to give your space character.
– Find out how simple projects, such as a pallet cooking station or a stone fire pit, can elevate your outdoor cooking experience.
– Get tips on adding ambiance with rustic lanterns and vintage chairs, perfect for those cozy evenings.
– Enjoy practical advice to make the most of your outdoor cooking space, ensuring it’s both charming and functional.
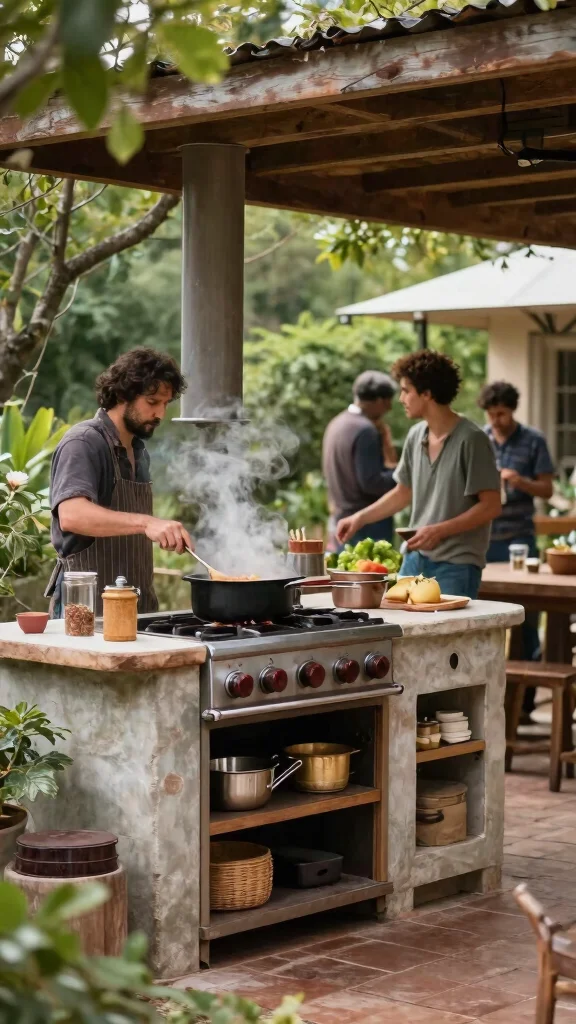
1. Reclaimed Wood Countertops
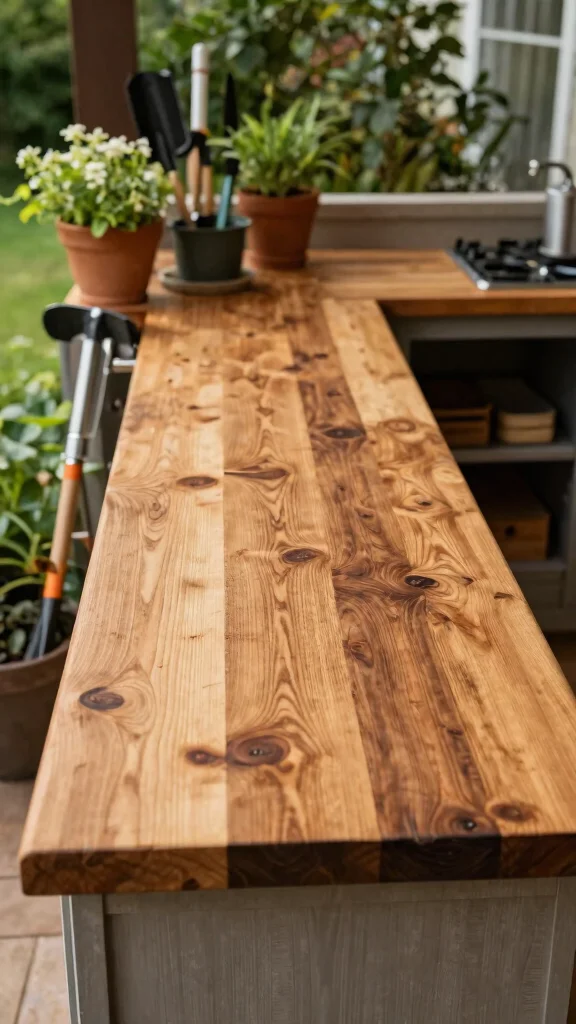
Are you dreaming of an outdoor kitchen that feels warm and inviting? Reclaimed wood countertops are the perfect solution, blending eco-friendliness with rustic charm. Sourced from old barns or furniture, these unique surfaces bring character and history to your cooking space while being durable enough to withstand the elements.
Each piece offers a story, allowing you to customize with stains or finishes that suit your style. Plus, it’s a cost-effective option that can become a stunning centerpiece, encouraging friends and family to gather and enjoy delicious meals together.
Ingredients:
– Reclaimed wood planks, cut to size
– Sandpaper (various grits)
– Weather-resistant wood sealant
– Stain or finish (optional)
Instructions:
1. Gather reclaimed wood planks and ensure they are clean and free from chemicals.
2. Sand down the wood to smooth out rough edges and surfaces.
3. Apply a weather-resistant sealant for durability against moisture.
4. Optionally, stain or finish the wood for a polished look.
5. Install the countertop on your kitchen base securely.
FAQs:
– How do I maintain reclaimed wood outdoors? Regular sealing and cleaning are crucial for longevity.
– Can I use a different type of wood? Yes, any durable wood can work as long as it’s treated properly.
Fun fact: Reclaimed wood countertops can slash material costs by up to 40% while giving your rustic outdoor kitchen on a budget undeniable warmth. Every plank carries a story—stain or seal to match your space, and you’ll enjoy a durable centerpiece that ages beautifully.
2. Pallet Cooking Station
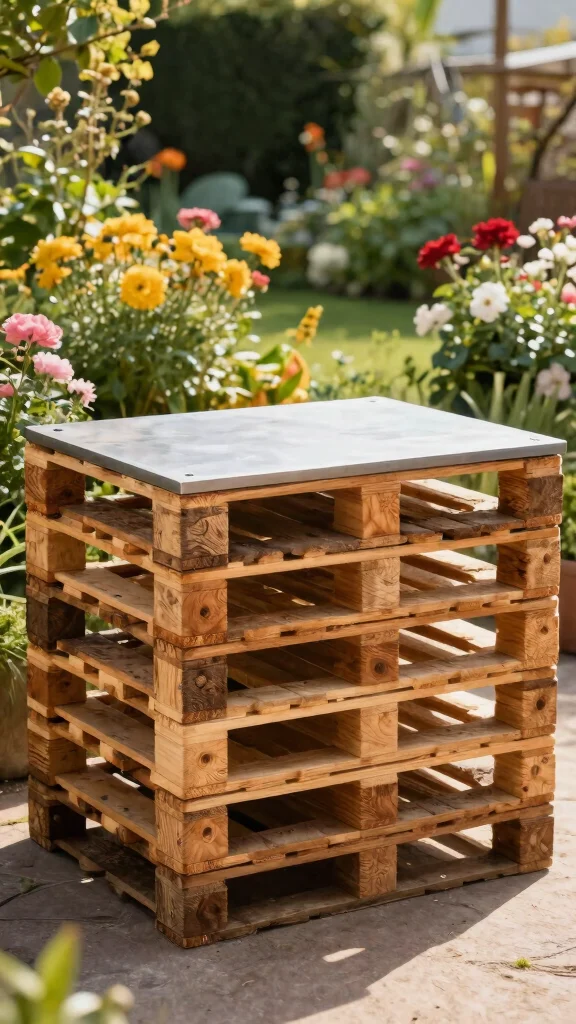
Looking for a budget-friendly way to enhance your outdoor cooking experience? Repurposing wooden pallets into a multifunctional cooking station is a fun and clever solution. Pallets can be transformed into tables or storage for your cooking essentials, adding a casual vibe to your kitchen.
With a little creativity, you can stack pallets and add a sturdy top for food prep. This DIY project not only saves money but brings rustic charm to your outdoor space, making it ideal for cooking and gatherings.
Ingredients:
– Wooden pallets (ensure they are clean and safe)
– A sturdy surface for the top (like plywood)
– Paint or stain (optional)
Instructions:
1. Start with clean pallets and inspect them for any damage.
2. Stack the pallets to your desired height and secure them together.
3. Place a sturdy surface on top for food preparation.
4. Optionally, paint or stain the pallets for added color.
5. Add wheels if you want a movable station.
FAQs:
– Can I use pallets that are not labeled safe? No, always choose pallets marked as safe for food use.
– How can I customize my pallet station? Add hooks for utensils or shelves for spices to enhance functionality.
3. Upcycled Metal Shelving
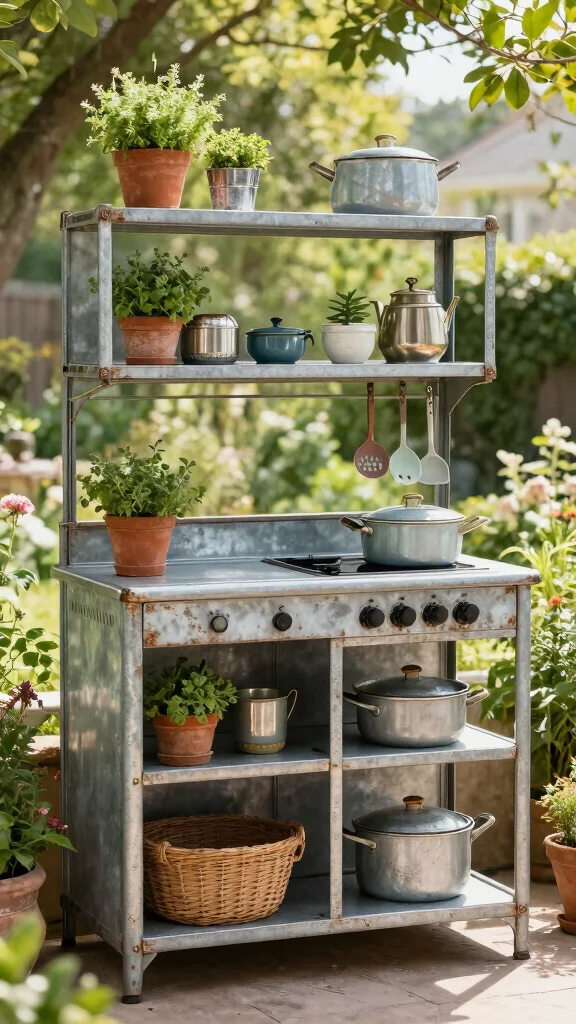
Do you need extra storage that also looks stylish? Upcycled metal shelving can add an industrial touch to your outdoor kitchen while providing ample space for storing pots, spices, and decor. These shelves are sturdy and weather-resistant, making them a practical choice for outdoor use.
By painting them or leaving them in their raw state, you can create a striking contrast with the natural elements around your kitchen. Plus, wooden crates or baskets can be added for organization, elevating both style and functionality.
Ingredients:
– Metal shelves (repurposed or second-hand)
– Paint (optional)
– Wooden crates or baskets (for storage)
Instructions:
1. Choose your metal shelving and clean it thoroughly.
2. Paint the shelves if desired for a fresh look.
3. Install the shelves securely against a wall.
4. Organize pots, spices, and decorative items on the shelves.
5. Add hooks for hanging utensils or towels.
FAQs:
– Can I use any type of metal shelf? Yes, just ensure they are rust-free and sturdy.
– How do I maintain them outdoors? Regularly clean and check for rust to keep them looking good.
4. Stone Fire Pit
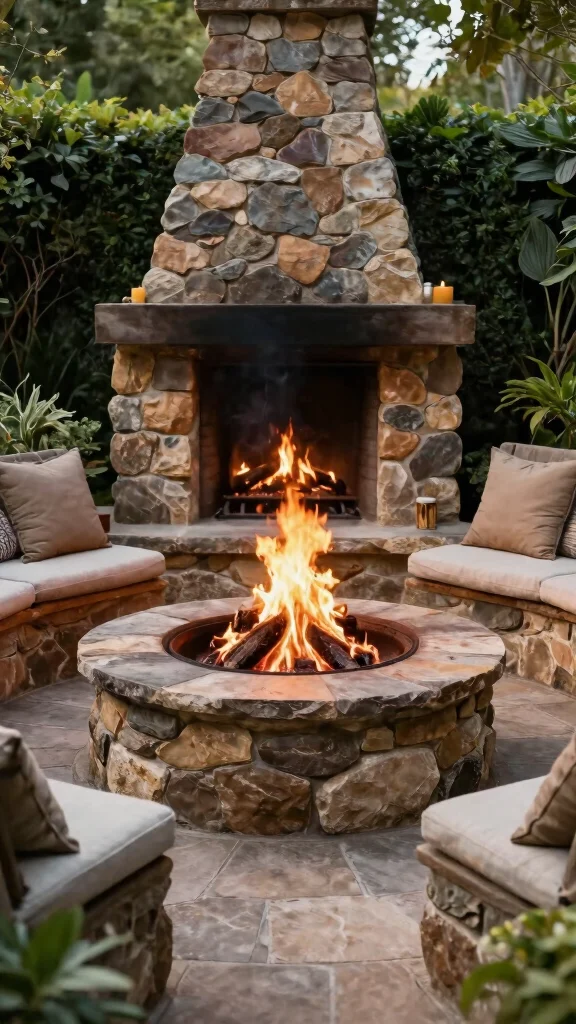
Are you envisioning cozy evenings spent outdoors? A stone fire pit can become the centerpiece of your rustic kitchen, providing warmth and a cooking spot for grilling or roasting marshmallows. You can source stones or bricks locally or even use leftover materials from your yard, keeping costs low.
This inviting feature creates a gathering spot for friends and family, enhancing your outdoor experience with its warmth and charm.
Ingredients:
– Stones or bricks (for building)
– Fire pit liner (optional)
– Firewood or charcoal (for fuel)
Instructions:
1. Select a flat area in your yard for the fire pit.
2. Arrange stones in a circular pattern, leaving space for airflow.
3. Secure the stones in place with gravel or soil.
4. Check local regulations regarding fire pits before use.
5. Light the fire and enjoy your cozy setting.
FAQs:
– Is it safe to have a fire pit? Yes, but always prioritize safety and follow local guidelines.
– Can I use it for cooking? Yes, just place a grill grate over the fire for cooking options.
5. Old Door as a Table
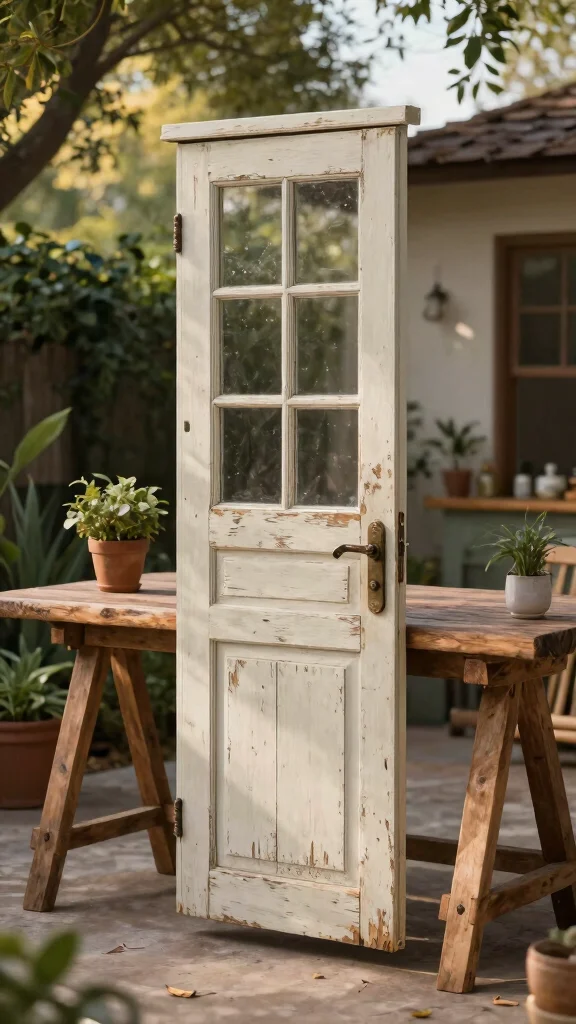
Want to create a unique table for your outdoor kitchen? Repurposing an old door can add character while being a fun DIY project. You can easily set it on sawhorses or tree stumps for a rustic table that’s perfect for meal prep or dining.
This eco-friendly option is budget-friendly and brings a personal touch to your outdoor space, making it a conversation starter.
Ingredients:
– An old door (with a flat surface)
– Sawhorses or sturdy legs (like tree stumps)
– Sandpaper (for finishing)
Instructions:
1. Sand down the door to remove rough patches.
2. Secure the door onto the sawhorses or legs.
3. Optionally, paint or stain it to fit your style.
4. Decorate with potted plants or candles for a charming touch.
5. Enjoy your new rustic table for meals and gatherings.
FAQs:
– Can I use any door? Yes, just ensure it has a flat surface.
– How do I clean it? Wipe down with a damp cloth to maintain its look.
6. Rustic Lanterns for Ambiance
Are you looking to create a cozy atmosphere in your outdoor kitchen? Rustic lanterns can add warmth and charm, especially during evening gatherings. Whether made from glass, metal, or wood, they enhance the outdoor cooking experience with their inviting glow.
These affordable options can be found at thrift stores or crafted yourself, making them a versatile decor choice to elevate your space.
Ingredients:
– Lanterns (glass, metal, or wood)
– Candles or fairy lights (for illumination)
– Seasonal decorations (like pinecones or seashells, optional)
Instructions:
1. Choose your lanterns and decide how you want to fill them.
2. Place candles, fairy lights, or seasonal decor inside.
3. Arrange lanterns on tables or hang them for a magical touch.
4. Adjust the lighting for desired ambiance.
5. Enjoy the cozy atmosphere as night falls.
FAQs:
– Are LED candles safe to use? Yes, they’re a safe alternative to real candles.
– How can I arrange them for best effect? Cluster different sizes for visual interest.
7. Herb Garden Planters
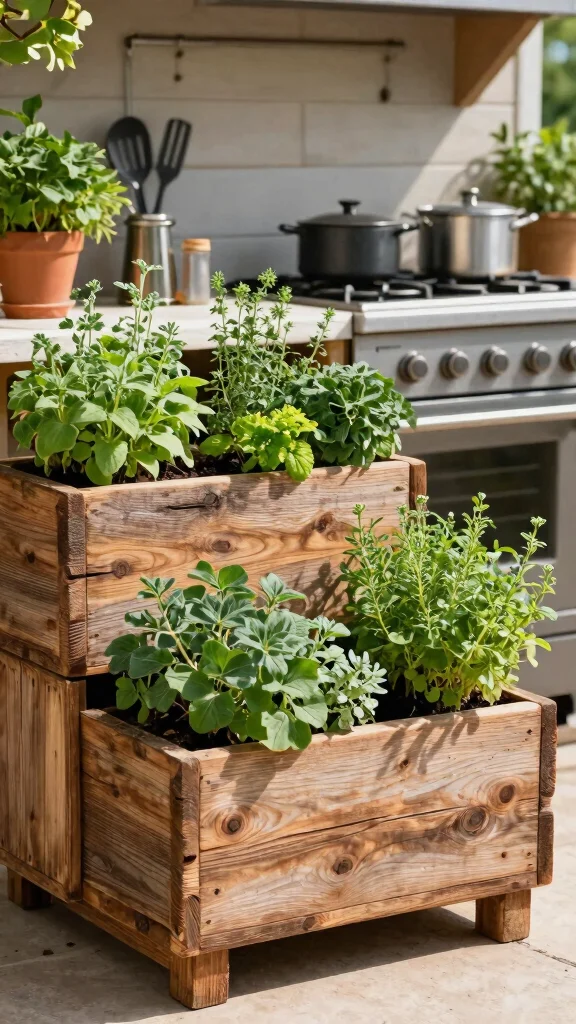
Want to elevate your outdoor cooking with fresh flavors? An herb garden in your kitchen adds beauty and practicality. You can easily create planters from reclaimed wood or old containers, bringing fresh herbs like basil, thyme, and rosemary right at your fingertips.
This addition not only enhances your cooking but also adds a green element to your space, making it vibrant and inviting.
Ingredients:
– Reclaimed wood or old containers (for planters)
– Soil (for planting)
– Herb seeds or seedlings (like basil, rosemary, etc.)
Instructions:
1. Prepare your planters with soil for planting.
2. Choose a sunny spot for your herb garden.
3. Plant seeds or seedlings and water them regularly.
4. Arrange planters for easy access while cooking.
5. Harvest herbs as needed for fresh flavors in your dishes.
FAQs:
– How much sunlight do herbs need? Most herbs thrive in full sun, so choose a bright location.
– Can I grow herbs indoors? Yes, many herbs can grow well indoors with sufficient light.
Turning salvaged wood and thrifted containers into herb planters makes your kitchen feel instantly alive. Fresh basil, thyme, and rosemary are within arm’s reach, turning cooking into a daily ritual. It’s the essence of a rustic outdoor kitchen on a budget, beautiful, practical, and totally doable.
Cost Breakdown & Budget Planning
Building a rustic outdoor kitchen on a budget doesn’t have to feel overwhelming. With a clear understanding of costs, you can create an affordable outdoor kitchen that looks stunning. Let’s break down the expenses you’ll encounter.
Cost Breakdown by Category:
– Materials/Products: Expect to spend between $200 to $1,500, depending on what you choose. Reclaimed wood, pallets, and upcycled materials can keep costs low.
– Tools/Equipment: If you don’t own basic tools, budget around $100 to $300. Essential tools include saws, drills, and measuring tape.
– Labor/Professional Installation: Going DIY saves money, but hiring professionals can cost $500 to $2,000. This varies based on the complexity of your design.
– Optional Extras: Decorative items and appliances may add $50 to $500. Think rustic lanterns, vintage chairs, or a nice sink.
Budget Tier Breakdown:
Basic Economy Tier $
– What’s included: With minimal spending, you can use reclaimed wood for countertops and DIY a simple pallet cooking station.
– Good for: This tier is perfect for those just starting or working with a tight budget.
– Limitations: You might miss out on features like a high-quality sink or more durable furniture.
Mid-Range Tier $$
– What’s included: This balanced option includes quality materials like treated wood and a simple outdoor sink.
– Good for: It’s suitable for families who want a functional outdoor cooking space without breaking the bank.
– Best value for: Most people will find this tier offers a solid combination of quality and aesthetics.
Premium Tier $$$
– What’s included: All the bells and whistles! Expect high-quality materials, professional installation, and extra features like a stone fire pit.
– Good for: This tier works well for those who entertain frequently or want a long-lasting outdoor space.
– Worth it if: You need a durable setup that can withstand the elements and heavy use.
Money-Saving Tips:
– Shop second-hand: Check thrift stores and online marketplaces for upcycled materials. You can find treasures at a fraction of the cost! 🛒
– Do it yourself: Embrace your inner DIY enthusiast! Building your own countertops from pallets or wood can save you hundreds. 💪
– Buy in bulk: Purchase materials like wood and screws in bulk to save money. This is especially helpful if you’re building multiple items. 📦
– Seasonal sales: Keep an eye out for sales, especially during spring and summer when outdoor items are popular.
Where to Splurge:
– Quality Grill: If you love cooking outdoors, invest in a quality grill. A good grill enhances your cooking experience and lasts longer. 🍔
– Durable Countertops: Spending a bit more on sturdy countertops ensures they withstand weather and heavy usage, making it a smart investment. 🛠️
– Lighting Solutions: Invest in good outdoor lighting. Charming rustic lanterns not only add ambiance but also improve safety for evening gatherings. ✨
With careful planning and awareness of costs, creating a charming backyard kitchen on a budget is entirely possible. Embrace your creativity, seek out deals, and enjoy the process!
8. Vintage Chairs
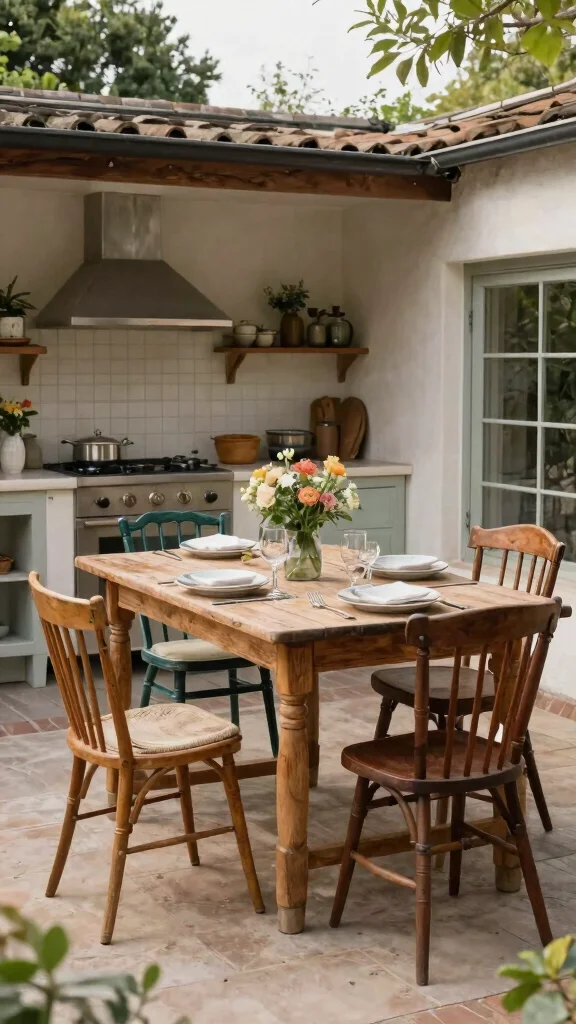
Looking to add personality to your outdoor kitchen? Vintage chairs can provide comfort and style, giving your space an eclectic vibe. Often found at flea markets or garage sales, these chairs are a budget-friendly way to enhance your rustic setting.
Mixing and matching different styles creates a cozy atmosphere where everyone can relax and enjoy meals together.
Ingredients:
– Vintage chairs (various styles)
– Weather-resistant cushions (optional)
– Small tables (for drinks or appetizers, optional)
Instructions:
1. Search for vintage chairs that match your theme.
2. Clean and refurbish them if needed.
3. Arrange chairs around cooking spaces for easy access.
4. Add cushions for extra comfort and style.
5. Place small tables beside chairs for convenience.
FAQs:
– Can I paint vintage chairs? Yes, painting can give them a fresh look that suits your style.
– How do I ensure they last outdoors? Use weather-resistant materials for cushions and regularly maintain the chairs.
Fun fact: swapping in two or three vintage chairs can transform your rustic outdoor kitchen on a budget, giving personality without breaking the bank. Mix styles, add weather-resistant cushions, and enjoy a cozy, eclectic vibe that invites everyone to linger.
9. Simple Outdoor Sink
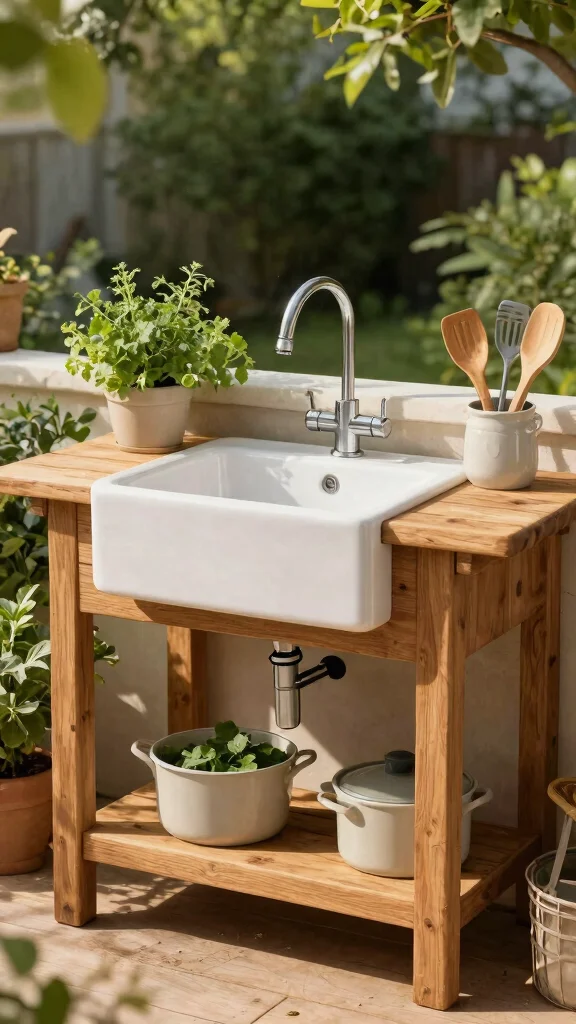
Is convenience important in your outdoor cooking setup? An outdoor sink can make food prep and cleanup a breeze! You can easily create a simple sink area using a repurposed basin or an old kitchen sink, enhancing functionality without breaking the bank.
This addition not only improves usability but also adds a charming feature to your outdoor kitchen, making it more inviting.
Ingredients:
– Repurposed basin or old kitchen sink
– Sturdy base (like a wooden table or pallets)
– Water source (hose or rain barrel)
Instructions:
1. Set up a sturdy base for your sink.
2. Install the sink securely on top.
3. Connect to a water source or use a rain barrel for an eco-friendly option.
4. Decorate the area with hanging plants or utensils.
5. Enjoy the ease of cleaning as you cook outdoors.
FAQs:
– Can I use a regular kitchen sink outside? Yes, but ensure it is weatherproofed.
– How do I keep the sink clean? Regularly rinse and wipe down to prevent buildup.
10. Upcycled Wine Barrel
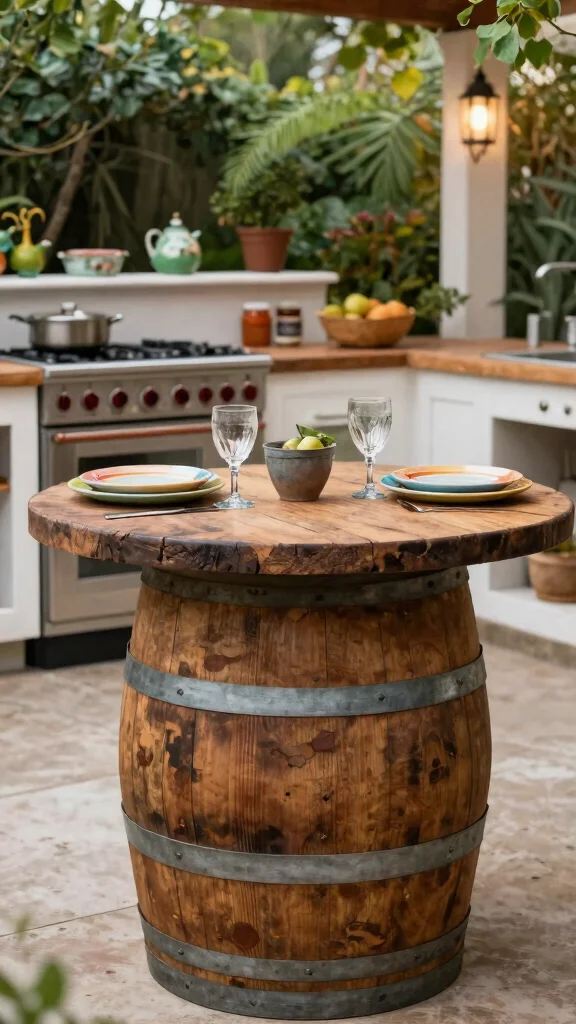
Want to add a unique touch to your outdoor kitchen? Transforming an old wine barrel into a rustic table or bar can create a charming centerpiece. The circular design not only provides ample surface area but also adds a sophisticated, vintage feel to your space.
Cutting the barrel in half can yield two tables, or you can keep it whole for a lovely gathering spot, enhancing your cooking area’s aesthetic.
Ingredients:
– Old wine barrel (from local wineries or second-hand shops)
– Sealant (to protect against weather)
– Glass top (optional, for dining table)
Instructions:
1. Inspect the wine barrel for any damage.
2. Cut the barrel if you want two tables, or keep it intact.
3. Seal the barrel to protect it from the elements.
4. Optionally, place a glass top on it for a dining table.
5. Pair with rustic stools for a cozy setup.
FAQs:
– Can I use any wine barrel? Yes, just ensure it’s in good condition.
– How do I maintain it outdoors? Regularly check the sealant and clean as needed.
11. Seasonal Decor
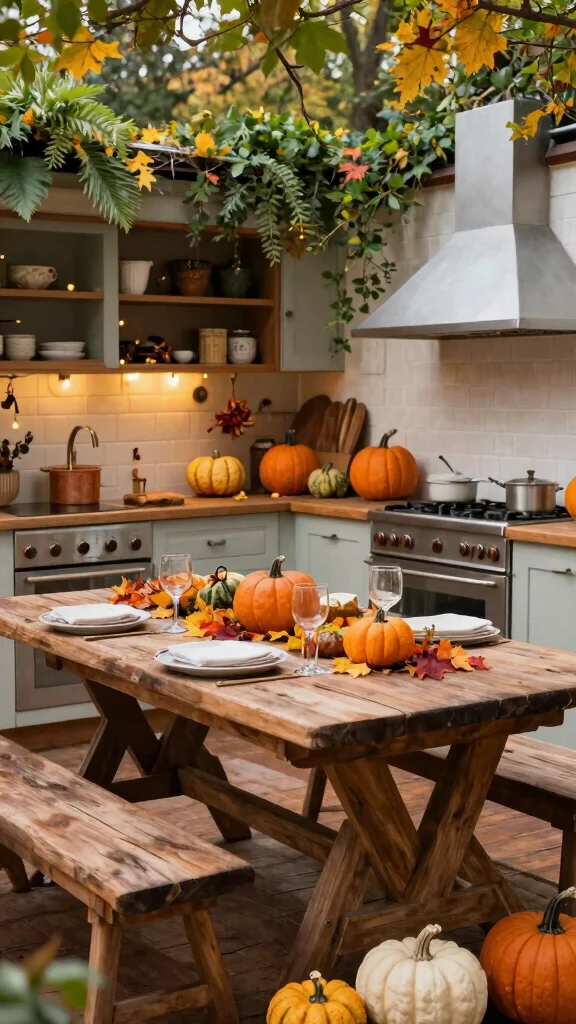
Do you want to keep your outdoor kitchen fresh and inviting? Incorporating seasonal decorations adds charm and keeps your space lively throughout the year. From autumn pumpkins to spring flowers, these elements bring personality and warmth to your cooking area.
Simple touches like table runners or themed decor can elevate your rustic kitchen, making it feel new and exciting with every season.
Ingredients:
– Seasonal decorations (like flowers or themed items)
– Natural materials (like wood or stone)
– Table runners or fabric (for a cozy feel)
Instructions:
1. Choose decorations that reflect the current season.
2. Arrange them on tables or around the cooking area.
3. Change decorations regularly to maintain freshness.
4. Use natural materials to keep with the rustic theme.
5. Involve family members in decorating for added fun.
FAQs:
– How can I store decorations for reuse? Keep them in a cool, dry place to maintain their quality.
– Can kids help with decorating? Absolutely! It’s a great family activity.
Conclusion
A rustic outdoor kitchen can become your favorite spot for family gatherings, dinner parties, or serene solo cooking sessions. By utilizing upcycled materials and budget-friendly ideas, you can create a charming space that exudes warmth and personality. Embrace your creativity and let your outdoor kitchen evolve into a cozy retreat that reflects your style and passion for cooking.
So grab your tools and dive into your DIY project. Your budget-friendly outdoor kitchen awaits!
Note: We aim to provide accurate product links, but some may occasionally expire or become unavailable. If this happens, please search directly on Amazon for the product or a suitable alternative.
This post contains Amazon affiliate links, meaning we may earn a small commission if you purchase through our links, at no extra cost to you.
Frequently Asked Questions
What are the easiest DIY upcycled materials to build a rustic outdoor kitchen on a budget?
Start with a clear plan and hunt for sturdy upcycled finds.
For a rustic outdoor kitchen on a budget, look for pallets for framing, reclaimed lumber for cabinets, an old door or countertop, a salvaged sink, and bricks or cinder blocks for a solid base.
Design an efficient layout, like an L-shape or straight run, with dedicated zones for cooking, prep, and storage.
Build surfaces from reclaimed decking or a repurposed door; seal with outdoor-grade finish to protect against weather.
Use weatherproof hardware and simple, durable components to keep maintenance low.
Budget tips: shop thrift stores, salvage yards, and online marketplaces; repurpose as many items as possible to achieve a budget-friendly garden ideas vibe.
With patience, you can create a charming backyard kitchen that looks much more expensive than it cost.
How can I design an affordable outdoor kitchen that still looks like a high-end space?
To keep it affordable yet chic, repeat a small set of materials and colors across the space.
Choose durable, weatherproof basics like concrete, stone, and aged wood with a weatherproof finish.
Keep the footprint compact to lower costs and maintenance.
Add one high-impact feature—a reclaimed wood countertop, a vintage metal sink, or a statement lighting fixture—to create that charming backyard kitchen feel.
Use under-counter storage to hide clutter and a simple, wipe-clean prep area for easy cleaning in a outdoor cooking space.
Shop secondhand for hardware, planters, and fixtures; with a smart plan, your rustic outdoor kitchen on a budget can look surprisingly polished.
What are the best budget-friendly ideas to maximize a small outdoor cooking space?
Maximize vertical space, multi-use furniture, and portable gear.
For a small space, think vertical gardens, wall-mounted shelves, and a fold-down prep table. Use a compact grill with a sturdy side table or a salvaged door as a prep surface.
Choose modular, weatherproof cabinets that can be reconfigured. Use a slim sink or hand-wash station if plumbing is feasible; otherwise a portable water container with a pour spout.
Create zones: cooking, prep, and storage, with a clear path for safety and airflow. Color and texture unify the look to achieve a budget-friendly garden ideas that still feels atmospheric. With careful layout, even a tiny space becomes an impressive outdoor cooking space in a charming backyard kitchen.
What common mistakes should I avoid when building a rustic outdoor kitchen on a budget?
Common pitfalls cost time and money.
Avoid overbuilding the space before testing your layout; start with a simple, functional sketch.
Skipping weatherproofing leads to rot and maintenance fatigue—seal wood, use rust-resistant hardware, and cover exposed surfaces.
Forgetting drainage and grease management can create mess and safety hazards; plan for a slight slope and a dedicated washing/cleaning area.
Choosing cheap, non-outdoor-rated materials that warp or deteriorate quickly will backfire; invest in a few durable core pieces and supplement with upcycled accents.
Finally, underestimate the importance of ventilation and safety, especially around grills and gas lines. With these cautions, your rustic outdoor kitchen on a budget stays practical, safe, and beautiful.
How can I maintain and upgrade my budget-friendly garden kitchen over time?
Keep it looking great with simple, regular maintenance and scalable upgrades.
Seal and reseal wood annually, clean surfaces after cooking, and protect metal parts to prevent rust.
Replace worn hardware with vintage or salvaged pieces for an instant DIY rustic kitchen upgrade without breaking the bank.
Expand storage gradually: start with crates, then swap in weatherproof cabinets as budget allows.
Add greenery and vertical planters to enhance the budget-friendly garden ideas and keep the overall look cohesive.
With a patient, incremental approach, your outdoor cooking space evolves into a durable, charming charming backyard kitchen that still feels affordable.
Related Topics
rustic outdoor kitchen
budget-friendly garden
DIY rustic kitchen
affordable outdoor kitchen
outdoor cooking space
charming backyard kitchen
upcycled materials
easy DIY projects
garden decor
rustic style
budget home improvement
outdoor entertaining